Monday, March 31, 2014

Captain America's Shield - Kid's Craft


Getting Captain America Week started with a really simple Kid's Craft. We wanted to make an easy Captain America shield that the little kids could do that wouldn't take too long after dinner. 

We gathered plates (mine were plastic but I suggest paper), ribbon and tape, some paint for the older two kids and construction paper for the little one. I already had three white stars cut out from a die-cut machine. I loosely sketched some circles for them to divide the colors they could use. 


All I used for the back was some ribbon and tape so they could hold their shields up. Simple enough! 


Stay tuned all week for some more Captain America related crafts! 

Saturday, March 29, 2014

Fun April Fool's Day Prank

My 4 year old is learning all about April Fool's Day jokes. Last year, he played a mean one on me by hiding around the car and I really couldn't find him for a few minutes putting me into panic-mom-mode. This year, I wanted to show him that you can have harmless April Fool's Day fun instead of scaring your own mother to death! 

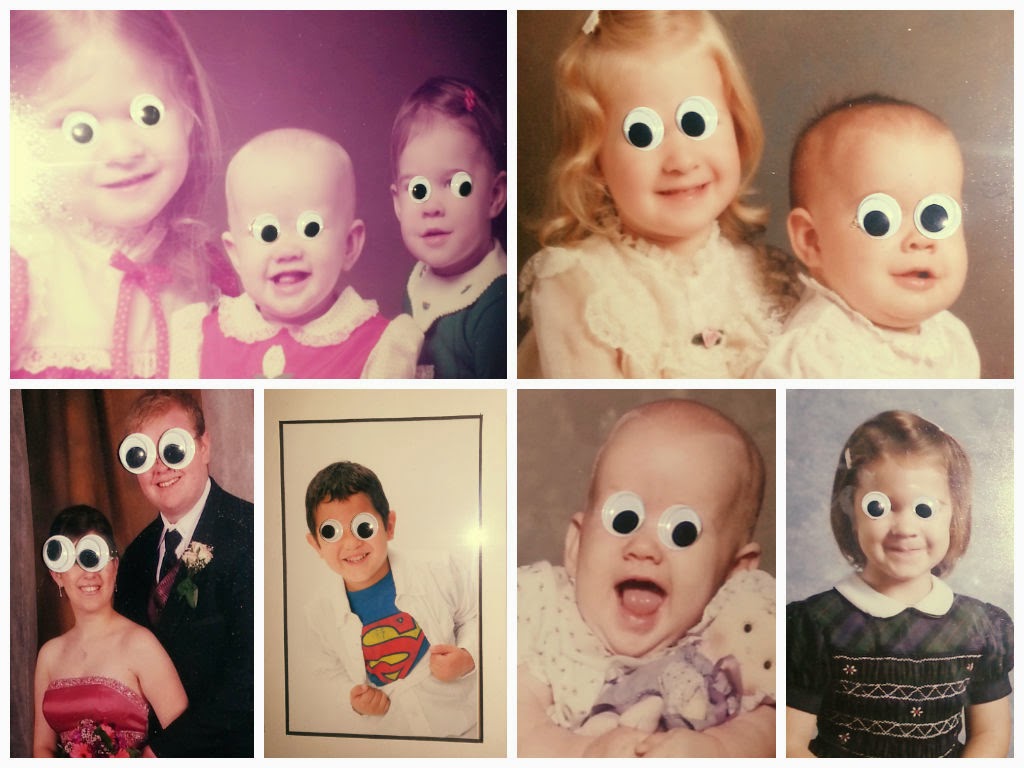
I had a ton of googly eyes from previous crafting and thought we could put them to good use. We started by putting them all over Nana's desk - the mouse, keyboard, stapler, drawer, coffee maker, etc. Then my fiance suggested we use the rest on the picture frames we have going up the staircases. Take a look:


My son had a lot of fun placing the eyes on the pictures and picking which ones would go where. Now he is patiently waiting for Nana to get home so she can be surprised by all the funny pictures. 

Now I'm planning a good harmless prank to pull on him! What are you doing this April Fool's Day? 

Wednesday, March 26, 2014

Build and Grow - Lowe's Classes for Kids!

Do you have a Lowe's in your area?
As you saw in our previous post, Crafting Kiddies , we are always looking for a creative outlet for our children... and honestly, it is even better if it is free!
My sisters and I were raised in a tight-knit family of 8 (6 children, 2 parents, and a few pets here and there). With there being so many of us, we were raised to make the most out of what you have and look for opportunities that are cost-effective. For most of us, this has carried on into our own parenting so when I hear of something fun to do and it is free or inexpensive to join, I try it out.

A few weeks ago, Maureen and I took our children to check out the Lowe's Build and Grow  program at our local hardware shop. Yes, we are fortunate to be in an area that has a Home Depot and a Lowe's close by.

This kid's class was a little bit different from the ones we had attended at Home Depot. With Lowe's, you must sign up to go to class on their website. Every store has a limited number of attendees so sign up early! Honestly, we had been trying to sign up for a few months but the local classes were always full. Once you sign up on the site, an email with permission slips is sent to the parents. You need to complete the form so that your child can attend. When we arrived, we needed to hand in our permission slips at the desk and were given our kits!

Lowe's did a great job, impressing us with the event! Every child was given a Lowe's apron, child-sized safety goggles, a small hammer to borrow, and a bird house kit with instructions and activity pages.

We took our kits to the tables that were set up and started our bird houses. It was great to see the children get excited about hammering in the nails. The birdhouse even had a hinged roof that allowed it to open and close. This was a great opportunity to teach the older kids about how hinges work too.


While we were hammering away, the manager of the Build and Grow program came by and introduced himself. He noticed that it was our first time and ran to give us an extra kit from a prior class so they kids would have a chance to build a little something at home. It was so nice of him!
Upon completion, we were given an iron on patch for our new aprons and a certificate of achievement!

The kids had a great time and so did the moms. It is always so nice to see your child have an opportunity to try new things! Thanks, Lowe's!!

Tuesday, March 25, 2014

DIY Flower Crafts

Today I'm sharing Spring inspired flowers you can create with things you have in your house.

First is the toilet paper roll flower. You cut five strips from the toiler paper roll, staple them together, and add a stem. You can paint them to be pretty colors and add a flower pot on the bottom (my son's idea). 


Next are some flowers made from tissue paper. Start with a few sheets of tissue paper and fold them accordion-style, flipping the paper over each time you fold. I cut mine down the center so i could make a fuller and smaller flower. Wrap a wire or pipe cleaner around the center. Then staple the tissue paper near the wire so it holds together. After that, just spread out your petals to your liking. 


Finally, I wanted to share some Duct Tape flowers my coworkers made for me when I changed jobs. They turned out beautiful and everyone at my new office loves them. Plus the gobstoppers at the bottom of the vase were a big bonus for my sweet tooth. 


Here's how you make them. Grab some pens, duct tape, and scissors if you don't like to rip the tape. Follow the steps below.


I'll bet you can find lots of things in your home that will make beautiful flowers! 

Monday, March 24, 2014

Spring is here! Quick Spring Crafts

Spring is finally here! We couldn't be more thrilled, even if it is still a bit chilly outside. Time to do some crafting to welcome this wonderful season. 


First, we made some pinwheels.


We gathered the supplies below: 
A hole punch, pencils, push pins, scissors, and 6x6 paper in Spring colors.


After we picked out our papers, we cut diagonal lines from each corner towards the center. Do not cut all the way to the center! 


Next, we punched a hole in the center of the paper and on the right side of each of the triangular pieces. 


I folded each corner with the hole into the center, put the push pin through the hole and stuck the entire thing onto the eraser of the pencil.


Now we had pretty pinwheels for Nana's plants! They didn't spin all too well because we used thick paper, but they sure look festive.


The next craft we did was for the birds.


Spread the peanut butter onto a toilet paper roll.


Roll the toilet paper roll in some bird seed.


Hang your bird feeder up in a tree using a wire or string. Enjoy the bit of free time you get afterwards as your child stares out the window waiting for birds.


Have you been getting inspired by Spring? Show us in the comments below! 


Sunday, March 23, 2014

DIY Eclectic Alphabet Wall Art: Part 4

Welcome back to our Alphabet Wall Art tips and tutorials. Today, we will run thru letter T to letter Z. I made a few of these letters from stratch so I will walk you thru that process as well!

T: I paid $2.29 on Amazon for this blue letter T. I painted the top green. Next, I painted the edge purple and glow-in-the-dark purple over that. With the lights out, the outline glows on this letter making it pretty cool!

U: The letter U was made by my sister-in-law, Sarah. Sarah started with a wooden letter and painted it royal purple. Taking a Martha Stewart punch, she cut out flowers of white paper that she had sponge painted with our green. She glued down the flowers in clusters and added Dewdrops. Next, a small letter U bought in the Micheal's clearance bins was glued to the front to finish it off.


V: I made the letter V from a Cheez-It box. I consulted the tutorial on Green Zebra Crafts for hints but mainly made up my method as I went. First, I printed the letter V I was trying to mimic from my computer. The letter is 11 inches wide so it took put most of my paper. First I removed the sides of the box and put them to the side so I only have the front and back of the box. We will be using those pieces later. Next, I traced and cut the front and back of the letter. Using the sides of the box and masking tape, I ran the cardboard along about a half inch inside of the edge of the letter. You can get an idea of the inset from the image below. I will admit-- I used alot of masking tape on this project. I opted not to decoupage or use a wet glue since I was working with cardboard.  After the letter was created, I painted it dark purple and used Elmer's glue to adhere the glitter. I sealed the letter so there wouldn't be glitter all over my house in the coming years.


W: My sister Caitlin made the letter W-- White Wedding. Caitlin had just been married the year before and I believe she was still feeling inspired. The letter was purchased already painted white. Caitlin used hot glue to attach the lace "veil" and "garter". To the garter, she also added a white ribbon and flower. Next, she took a cluster of purple ribbon roses withe a spray of pearls. Using Glossy Accents, Caitlin attached a pearl necklace using scrapbooking half pearls.

X: I bought the fabric covered X on Amazon as well (again for $2.29). The edges of the letter are green with white polka-dots but the front was blue and white gingham. I used acrylic paints to make the front of the X all green and added white dots by hand.

Y: Using a chipboard letter that is 11x11, I chose to yarn wrap the letter Y. I chose a lovely variegated purple yarn by Patton's. To keep the ends from falling off of the rounded edges of the letter, I added a bead of Elmer's glue to each end on the back side.

Z: I made the letter Z using cardboard and masking tape. Again, I used a cereal box, removed the sides of the box and cut out the front and back of the letter from the front and back of the box. "More masking tape!", I cried as I used the cereal box sides to give my letter a uniform thickness all around. For this letter, I made the sides and front edges meet in a smooth transition. I painted the edges purple and the front white. Next, I took my scrapbook supplies and pulled out all of the green, purple, brown, and white letter Z's that I had. It probably does not surprise you but the letter Z is not one that I use often so I had many options to choose from. I glued and layered the Z's on in three different occasions so that I could let the glue dry and add the dimension I wanted.


More to come on making your own eclectic alpha wall!

Friday, March 7, 2014

Rainbow Cupcakes - Your Child Will Be Too Excited!!

For Easter dinner, I made this delightful dessert for my family last year and I am thinking about bringing them back for an encore this year too-- they were such a hit!
Rainbow Cupcakes! I wanted to share the recipe with everyone because though it was really easy to do-- I had never heard of it before!. I basically used the recipe at Family Fun, but with a few minor edits.

First, you need a box of cake mix. I went with white cake mix because it is easiest to get the colors you want. You will also need Red Blue and Yellow liquid food coloring and cupcake papers. I added icing to mine, but you don't have to really.

Mix up the cake mix as directed and divide your batter into 6 different bowls with 6 different spoons. Add in food coloring until you get the tint desired. I had to use different combinations of the colors to get my rainbow than the recipe calls for-- I like mine vibrant!

Next, add the colors mix to the cupcake papers. I did this in ROYGBV order for authenticity, but you don't have to. One thing to note, it was really hard to figure out "how much" I needed of each color in each cup. The lesson learned-- it could be a thin layer in the middle as long as the color reached out to the sides. It will all work out, trust me. Also, I made 18 cupcakes-- the recipe says to make 16. I think you could even make 20-24, depending on how much you fill the cups. I had some minor overflows on half my cakes so it is totally possible to make more.= without scrimping.


Next, bake as directed. That's it! Again, I made icing to top them off but you do not have to. If you do and you are planing to travel, I suggest icing them when you get there. The directions say to remove the cupcake papers for presentation-- I didn't. Personal choice.

These were a big hit and very fun to make. Just be sure to give yourself an extra 15-20 minutes prep-time for batter distribution.

Enjoy!


Wednesday, March 5, 2014

Homemade Peppermint Patties

YUM!

I found this recipe for Homemade Peppermint Patties and I have to say-- they are amazing! They melt in your mouth, which is delightful. I made them with milk chocolate, not the traditional dark chocolate... mainly because I didn't have any dark in the house and was too lazy to go out and get the right stuff.

I brought them into work for our St. Patty's day celebration last year and got rave reviews. Since I didn't have the recipe with me for my co-workers, I wrote up a variation to the steps. I have posted them here below... and who knows, if you make them, my explanations may be helpful. For the complete recipe, please see In Between Laundry. I did not want to re-print her work without permission!

Directions: Makes @ 100 patties, dependent on size
In a bowl, combine the potatoes, butter, peppermint, and powdered sugar and mix well (I used an electric beater). Add more sugar if your mixture is loose--it should feel like a tacky cookie dough. (I ended up using almost exactly 3 pounds.)

Lay wax paper down over a few cookie sheets (for easy cleanup later). Scoop teaspoonfuls of the dough and shape into patties. (The easiest way to do this is to scoop with an ice cream scoop or two spoons since it will be a little sticky. Once you have the whole cookie sheet covered, go back and pat them flat with your hands. The balls will lose their tackiness as you are scooping out the rest of the tray, making them easier to shape.) Refrigerate for a few hours so you can handle them to add the chocolate.

Melt the chocolates with the oil and dip the chilled patties, covering completely. This step takes some practice since the dough balls can melt with the hot chocolate. The best method I found was chocolate-ing the bottoms of each patty with a knife and going back once the sheet is done to cover the tops with chocolate. There are probably better methods out there, but I am a novice at baking. Chill until set.

Yum! Give it a try-- they are tooooo tasty!

Tuesday, March 4, 2014

Snow Day Activities Round Up


We've had a lot of snow around here this winter, which has led to a lot of snow days with the kids. It gets a little crazy around here if the kids aren't kept distracted. Here are some fun ideas to keep things sane. 

First, do you have any washi tape or masking tape? 


Dirt and Boogers made this adorable little city using some tape and dumping Legos, blocks, and a train set out for the kids to create.


This is another example of a town made from tape on the floor. 


Since you already have the tape out, why not try a fun maze for all those action figures to get through? By OurScribbledWalls


Have any Marshmallows in the cabinet? Try these out:


A tower made of marshmallows and spaghetti. There are so many ways you can make one, and its fun to see how tall you can get it! Here's one my teammates made at work, but you can definitely get some kids in on the action.


License2mommy made this cute indoor snowman from marshmallows. 


If you want to get really creative and do some DIY with the kids, try these:


Make your own playdough using stuff from your cabinet! 


These wands by trainsandtutus might take some setting up the night before, but they turn out amazing!


If you have kids that love to build things, try these activities:


Stacking cups up high and then knocking them all over! I know a few little boys that would love doing that! By Allboyhomeschool


There are so many ways to do a tension rod fort, and if you have one or two of those rods handy you are good to go! Here is a cute pirate fort by diaryofapreppymom


If you have some boxes laying around, why not make a city? Here's one I made for my son with boxes left over from Christmas. It started off as Gotham City, then later blankets were thrown across the boxes to make a Ninja Turtle Sewer. He played in there a long time!


And if you're really interested in going out in that snow, here are a couple ideas to make it more interesting:


Put some food coloring into spray bottles and spray the snow! How adorable is this snowman by HowDoesShe?


Use that same food coloring and some balloons to make these big ice marbles! Hide them in the snow and let the kids go on a treasure hunt. 


I hope that gives you some fun ideas to get through the rest of the winter season. Here's hoping for warmer days ahead! 


Our First Craft Fair!


We did it! We had our first craft fair this past weekend at Holy Cross Church in Springfield, PA. It was a great learning experience for us and we had a lot of fun spending the day together. Products sold during this fair included lots of hero inspired jewelry, Lego jewelry, hero and TMNT library bags, hero cards, crochet TMNT and hero hats, handmade soap, barrettes, picture frames, diaper cakes, and duct tape wallets. A lot of the jewelry and crochet patterns/hats are sold at our Etsy Store. We are looking to join in another craft fair soon so check back for updates on when and where! 

Monday, March 3, 2014

St. Patrick's Day Craft- Candy Gift

I have seen a lot of St. Patrick's Day rainbow treats and wanted to share some I made last year. The materials I gathered were 3 x 10 treat bags, M & M's, Rolo's, gold chocolate coins from the super market bulk candy isle, and rainbow Twizzlers. 

My son helped sort all of the candy by color. It was a fun thing for a toddler to do, and he was learning to sort and identify colors at the time so it was perfect all around! 


After sorting all of the candy, I put the M&M's and Rolo's together. The Rolo's were the gold at the bottom and the M & M's were in rainbow order on top.


I put the big gold coins on the bottom of the Rainbow Twizzlers. 


Of course the longest task was sorting those M&M's and many of them went missing during the sorting! I handed these out to my team at work. They were a hit!