Showing posts with label home decor. Show all posts

Tuesday, January 17, 2017

Valentine's Day Crafting: More Decorations

I'm back again with more Valentine's Day decorations. I'm having a ton of fun putting these together.

First, the kids and I started painting wooden pieces we got at Michael's. My little man did a great job on his love birdhouse. 


I painted two signs. One I painted white and then went over loosely with gold paint. 


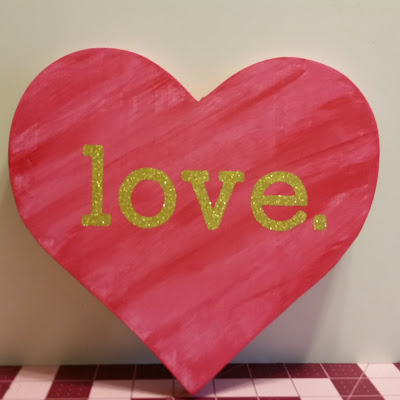
The second one was in the shape of a heart and I went over it in several shades of pinks and then again in red to give it a streaky-stripe look. 


Using the Silhouette Cameo, I cut out a quote from Beauty and the Beast for the first sign to go along with a painting I have on my mantle right now. 


I used more of that fun gold glitter vinyl for the word "Love" on the heart. It is so sparkly! I'm going to put a hanger on the back so I can hang this heart up on the wall. 


Next I cut out our names on vinyl and adhered them to these great little mailboxes I found in Target in the dollar bins. I'm going to put little love notes in there for the boys to read on Valentine's Day. 


Here is part of my mantle with the painting I mentioned previously! (Painting With a Twist)


That's all for now! We are decorated! 

Monday, January 16, 2017

Valentine's Day Crafting - Decorations

All the Christmas decorations are officially away. My house looks empty without them. Valentine's Day is  less than a month away I am itching to keep it looking nice and decorated with lots of hearts and pink and red things! 

The first project I worked on was a Tulle Wreath: 


I started with a wire wreath from Michael's, scissors, lots of tulle in different colors, and a Be Mine hanging decoration I bought at the dollar store years ago. I normally just have that on the front door but this year I want a full wreath! 


Using my measuring cutting mat that is on my desk, I cut 6 inch pieces of tulle and just tied them in knots going around the wreath on the outside circle. I didn't do a pattern or follow any order, I just grabbed whatever color and went with it. 


Then I began tying them to the inside circle. It was time consuming but if you cut all your tulle beforehand and put on your current Netflix binge-watch you are good to go! 


Here is mine all done and on my crazy bright door. It is so full and fluffy and pink! 

What I love about the tulle wreaths is that you can do some for any season in any colors. I got the idea from the Santa wreaths we made at a Pinterest Party recently. They were amazing. 


Tuesday, March 25, 2014

DIY Flower Crafts

Today I'm sharing Spring inspired flowers you can create with things you have in your house.

First is the toilet paper roll flower. You cut five strips from the toiler paper roll, staple them together, and add a stem. You can paint them to be pretty colors and add a flower pot on the bottom (my son's idea). 


Next are some flowers made from tissue paper. Start with a few sheets of tissue paper and fold them accordion-style, flipping the paper over each time you fold. I cut mine down the center so i could make a fuller and smaller flower. Wrap a wire or pipe cleaner around the center. Then staple the tissue paper near the wire so it holds together. After that, just spread out your petals to your liking. 


Finally, I wanted to share some Duct Tape flowers my coworkers made for me when I changed jobs. They turned out beautiful and everyone at my new office loves them. Plus the gobstoppers at the bottom of the vase were a big bonus for my sweet tooth. 


Here's how you make them. Grab some pens, duct tape, and scissors if you don't like to rip the tape. Follow the steps below.


I'll bet you can find lots of things in your home that will make beautiful flowers! 

Monday, March 24, 2014

Spring is here! Quick Spring Crafts

Spring is finally here! We couldn't be more thrilled, even if it is still a bit chilly outside. Time to do some crafting to welcome this wonderful season. 


First, we made some pinwheels.


We gathered the supplies below: 
A hole punch, pencils, push pins, scissors, and 6x6 paper in Spring colors.


After we picked out our papers, we cut diagonal lines from each corner towards the center. Do not cut all the way to the center! 


Next, we punched a hole in the center of the paper and on the right side of each of the triangular pieces. 


I folded each corner with the hole into the center, put the push pin through the hole and stuck the entire thing onto the eraser of the pencil.


Now we had pretty pinwheels for Nana's plants! They didn't spin all too well because we used thick paper, but they sure look festive.


The next craft we did was for the birds.


Spread the peanut butter onto a toilet paper roll.


Roll the toilet paper roll in some bird seed.


Hang your bird feeder up in a tree using a wire or string. Enjoy the bit of free time you get afterwards as your child stares out the window waiting for birds.


Have you been getting inspired by Spring? Show us in the comments below! 


Thursday, February 6, 2014

Lego Week: DIY Lego Key Holder

I love the idea of adding fun into your home decor. I have seen a few different key holders around the internet including one that is sold by Lego and thought... I can do that!

For this Lego project, I started tinkering with a few of the Lego pieces we picked up at the store last week. My partner came upon me and demanded he participate. Ian has been an avid Lego fan since he was a small child.

To make the plate, we used a Lego Blue Building Plate as the base. Next, Ian designed the door. He used pieces we had purchased at the Lego store from the brick wall to make a flat door, trim, and doorknob brick.  The key, he used several bricks without the bumps on the top to give the feeling of a sleek piece of metal.

You can approach this at several levels of DIY. In our case, we made key chains with the Technic Lego block that are designed with holes in the sides of the bricks. I bought a package of key rings at Micheal's-- done! You could use a drill and put a hole in your own standard Lego brick too! Here, you would choose a good place for your ring, drill, and add in the key ring. On an even simpler level, you could buy a ready-made Lego man key chain available in the stores and online.

Using a drill, make a whole in the Lego plate close to each corner and screw into the wall by your front door. Alternatively, you could use mirror hooks to hang the plate if you are shy about putting holes into your precious Lego pieces.

Ian was so excited about the project, he pulled out a notebook and started sketching an "even better" key holder for our home. I see a special online order in my future-- and I promise to post the results of that adventure as well.