Showing posts with label Kid's Activities. Show all posts

Wednesday, November 26, 2014

Simple Christmas Activity Calendar Banner-Style


This year's Christmas Activity Advent Calendar came together quickly. I was able to get this done in under an hour! 

This was a very simple project:

 1. cut even strips of Kraft Paper
  2. fold in half
3. stamp numbers and stars on the front
 4.write the activity of the day inside
  5. close with Washi tape

 I then pinned them onto some twine that will hang somewhere in the house where my son can take them down each day to read the activity. I am excited to try this more simple version out this year.

A lot of the activities are the same as last year's Activity Calendar, but I changed around a few - we have a couple of events this December and I wanted to try out some new activities. too.


1. Decorate the House and Make a Decoration
2. Write a Letter to Santa (we use the Mega Monkey Mash printable
3. Take a Family Photo
4. Order and Make Christmas Cards
5. String Lights Outside
6. Go Ice Skating
7. Visit Santa at the Company Christmas Party (or the mall)
8. Christmas Family Game Night
9. Make Presents (my son makes small things for his Aunts and Uncles. Last year he painted ornaments)
10. Watch a Christmas Movie
11. Make a Christmas Craft (this year I am thinking of some hand and foot print crafts)
12. Dinner Date
13. See the Light Show at our local farm 
14. Decorate the Tree
15. Bake Cookies
16. Check out the lights around the neighborhood, pick out our favorite house (maybe leave a prize at their door!) 
17. Another Christmas Movie Night
18. Write and Draw a new Christmas Story
19. Christmas Date in the City (we live near Philadelphia)
20. Decorate Gingerbread House
21. Winter Walk in the Park 
22. Make a New Ornament for the Tree
23. Wrap the Presents We Made
24. Cookies and Milk for Santa! And go to sleep early of course.


Do you have any fun Christmastime traditions? Please share! I am always looking for something different to try. 


Monday, November 24, 2014

Elf on the Shelf Calendar

Today I am sharing my Elf on the Shelf calendar I plan to follow for 2014. I have been feeling so busy lately I thought it would just be easiest to make my own calendar so I don't even have to think about what to do each night with the Elf. This is only my second year doing the Elf on the Shelf tradition. Last year I tried to stick to my plans but I didn't always follow through - no big deal. There is no pressure in my opinion - do what you can! 


Our elf is getting just a little mischievous this year, but not making too much of a mess. Do you have any elaborate Elf ideas this year? Or does your Elf like to stay put on one shelf? 

Sunday, November 23, 2014

Christmas Traditions: A Book a Day

I cannot believe Christmas Eve is only a month away. I am in the middle of moving to my first house so I feel a little lost for time! This year I wanted to keep my book tradition simple.


 I did not buy any new Christmas books and I wrapped everything in brown package paper. After I wrapped all the books I stamped the date I want my son to read the book on the paper- simple and fast. He absolutely loved opening and reading the books last year and I plan to keep it going for many years to come. 


I am working on my activity advent calendar next. I'm trying to figure out how to make a quick and simple version. Here is last year's Book list and Activity Advent Calendar. Have you begun working on any projects for the holiday season? 


Thursday, July 31, 2014

Happy Birthday, Harry Potter!

Did you know it is Harry Potter's Birthday today? My son very recently just saw some of the movies for the first time and has been obsessed ever since, and wants to be Harry for halloween this year. A few months ago, I posted a link to this tutorial which shows you how you can make wands. I had planned on trying it out but didn't get around to it until the kid showed an interest.

They were so easy! They're the perfect size and they are actually very sturdy. Each one is unique and the instructions were simple to follow. I wanted to share our wands that we made with the tutorial by trainsandtutus. We each made our own with dowels ($3.00 for a bag of 20), a glue stick, construction paper, hot glue gun, and paint. I have plenty more to make for my neice and nephews, too!


First we took a dowel and put glue all over the back of a piece of construction paper. We rolled the dowel tightly in the paper and snipped the ends.

Then I took a glue gun and made handles and random designs on the wands. I spun the stick while slowly pouring the glue out to make the handles and i liked how it dripped down the stick as I went.


They dry pretty quickly but I let it sit a few hours just in case. After that, I painted over everything in black acrylic paint. The glue was easy to paint.


 I almost wanted to keep it like that! It looked cool. But I had the metallic paint and wanted to give it a shot so we each painted our own wands.


I loved the tutorial and I love the wands so much I'm definitely making more. It was so simple and the result is unique, fun, and sturdy. Give it a try and share pictures!

Have a great Harry Potter's Birthday!

Monday, March 31, 2014

Captain America's Shield - Kid's Craft


Getting Captain America Week started with a really simple Kid's Craft. We wanted to make an easy Captain America shield that the little kids could do that wouldn't take too long after dinner. 

We gathered plates (mine were plastic but I suggest paper), ribbon and tape, some paint for the older two kids and construction paper for the little one. I already had three white stars cut out from a die-cut machine. I loosely sketched some circles for them to divide the colors they could use. 


All I used for the back was some ribbon and tape so they could hold their shields up. Simple enough! 


Stay tuned all week for some more Captain America related crafts! 

Saturday, March 29, 2014

Fun April Fool's Day Prank

My 4 year old is learning all about April Fool's Day jokes. Last year, he played a mean one on me by hiding around the car and I really couldn't find him for a few minutes putting me into panic-mom-mode. This year, I wanted to show him that you can have harmless April Fool's Day fun instead of scaring your own mother to death! 

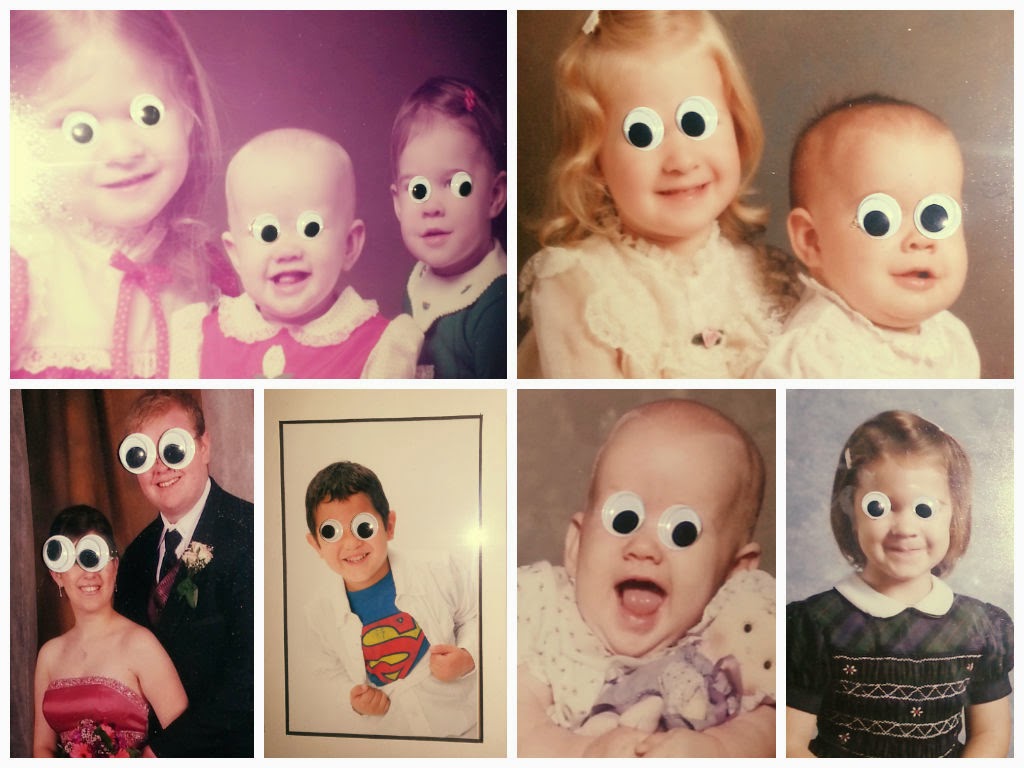
I had a ton of googly eyes from previous crafting and thought we could put them to good use. We started by putting them all over Nana's desk - the mouse, keyboard, stapler, drawer, coffee maker, etc. Then my fiance suggested we use the rest on the picture frames we have going up the staircases. Take a look:


My son had a lot of fun placing the eyes on the pictures and picking which ones would go where. Now he is patiently waiting for Nana to get home so she can be surprised by all the funny pictures. 

Now I'm planning a good harmless prank to pull on him! What are you doing this April Fool's Day? 

Wednesday, March 26, 2014

Build and Grow - Lowe's Classes for Kids!

Do you have a Lowe's in your area?
As you saw in our previous post, Crafting Kiddies , we are always looking for a creative outlet for our children... and honestly, it is even better if it is free!
My sisters and I were raised in a tight-knit family of 8 (6 children, 2 parents, and a few pets here and there). With there being so many of us, we were raised to make the most out of what you have and look for opportunities that are cost-effective. For most of us, this has carried on into our own parenting so when I hear of something fun to do and it is free or inexpensive to join, I try it out.

A few weeks ago, Maureen and I took our children to check out the Lowe's Build and Grow  program at our local hardware shop. Yes, we are fortunate to be in an area that has a Home Depot and a Lowe's close by.

This kid's class was a little bit different from the ones we had attended at Home Depot. With Lowe's, you must sign up to go to class on their website. Every store has a limited number of attendees so sign up early! Honestly, we had been trying to sign up for a few months but the local classes were always full. Once you sign up on the site, an email with permission slips is sent to the parents. You need to complete the form so that your child can attend. When we arrived, we needed to hand in our permission slips at the desk and were given our kits!

Lowe's did a great job, impressing us with the event! Every child was given a Lowe's apron, child-sized safety goggles, a small hammer to borrow, and a bird house kit with instructions and activity pages.

We took our kits to the tables that were set up and started our bird houses. It was great to see the children get excited about hammering in the nails. The birdhouse even had a hinged roof that allowed it to open and close. This was a great opportunity to teach the older kids about how hinges work too.


While we were hammering away, the manager of the Build and Grow program came by and introduced himself. He noticed that it was our first time and ran to give us an extra kit from a prior class so they kids would have a chance to build a little something at home. It was so nice of him!
Upon completion, we were given an iron on patch for our new aprons and a certificate of achievement!

The kids had a great time and so did the moms. It is always so nice to see your child have an opportunity to try new things! Thanks, Lowe's!!

Tuesday, March 4, 2014

Snow Day Activities Round Up


We've had a lot of snow around here this winter, which has led to a lot of snow days with the kids. It gets a little crazy around here if the kids aren't kept distracted. Here are some fun ideas to keep things sane. 

First, do you have any washi tape or masking tape? 


Dirt and Boogers made this adorable little city using some tape and dumping Legos, blocks, and a train set out for the kids to create.


This is another example of a town made from tape on the floor. 


Since you already have the tape out, why not try a fun maze for all those action figures to get through? By OurScribbledWalls


Have any Marshmallows in the cabinet? Try these out:


A tower made of marshmallows and spaghetti. There are so many ways you can make one, and its fun to see how tall you can get it! Here's one my teammates made at work, but you can definitely get some kids in on the action.


License2mommy made this cute indoor snowman from marshmallows. 


If you want to get really creative and do some DIY with the kids, try these:


Make your own playdough using stuff from your cabinet! 


These wands by trainsandtutus might take some setting up the night before, but they turn out amazing!


If you have kids that love to build things, try these activities:


Stacking cups up high and then knocking them all over! I know a few little boys that would love doing that! By Allboyhomeschool


There are so many ways to do a tension rod fort, and if you have one or two of those rods handy you are good to go! Here is a cute pirate fort by diaryofapreppymom


If you have some boxes laying around, why not make a city? Here's one I made for my son with boxes left over from Christmas. It started off as Gotham City, then later blankets were thrown across the boxes to make a Ninja Turtle Sewer. He played in there a long time!


And if you're really interested in going out in that snow, here are a couple ideas to make it more interesting:


Put some food coloring into spray bottles and spray the snow! How adorable is this snowman by HowDoesShe?


Use that same food coloring and some balloons to make these big ice marbles! Hide them in the snow and let the kids go on a treasure hunt. 


I hope that gives you some fun ideas to get through the rest of the winter season. Here's hoping for warmer days ahead! 


Thursday, February 13, 2014

Kids Valentine Crafts

I love getting the kids involved in Valentine's Day Crafts. Here is one that I did with my son two years ago. It was so easy for a 2 year old to do. I traced his hand and arm on brown card stock and cut it out. Then i used heart punches in two sizes to cut out light pink and hot pink hearts. I put sticker tabs on the backs of all the hearts and let him put them wherever he wanted. 


He went for a falling leaves style - so cute. I put green card stock on the bottom of the page for the grass and he picked out a picture he liked so I could put it on the page. 


This year we took an embroidery frame in the shape of a heart, used some thread to attach paper to it, and he and I both put our thumb prints on the paper to make a Love Bug. He added the googly eyes, the bow, and drew the legs. I wrote the Love Bug 2014. I love making a project together with him.


Another craft we did together was for preschool. It was this heart that was supposed to have our family in it. He picked out the papers from a 6x6 paper pad, I cut them and he told me where they go. Then he picked out the family sticker and hearts and put the glue on everything. I did the stickers with our names. 


Monday, February 10, 2014

The Gift of Adventure


Today, I will be sharing with you a gift idea. Every year, my family has a Pollyanna exchange at Christmas time. This year to keep things interesting, we chose Pollyanna’s as couples. This gift was a wonderful Christmas present but could be given year-round at a Bridal Shower or to your partner this Valentine’s day!
The concept of the gift Is simple—I sat down and brainstormed 8 mini adventures my sister could go on with her fiancé and 8 more adventures that she could do with her fiancé and son. We had a spending limit of $100.00 a couple so there isn’t anything in here that is bank-breaking. In some cases, the gift pays for a small portion of the date, all of the date, or the date is something that is largely free. I made sure there was a variety of activities—funny adventures, physical challenges, food-related, artistic… something for everyone to enjoy.
I started the gift with the carrying case. This helped to set the restrictions and realities for what we could accomplish. I purchased an Extra Large IRIS Photo and Craft Keeper, 16 individual 4x6 cases within at Michael’s (with a coupon!!). I knew I needed to make each adventure fit in to a 4x6 photo case and I needed to have 16 in total. Maureen has a ton of printed pictures so I was confident that she would use the case even if she dismantled the adventures. I did choose options that you can keep doing over and over again (aside from the couple needing to purchase more items), so she could use the case for years to come as well.
Coming up with gifts that would fit into the case—that was the fun challenge for me! Take a look at the printable (link below) that I have included in this post for more information. I have the date descriptions, what I included in each case, and the case labels for each all ready for you to peruse -- you can make your own!

On a side note, my sister is an avid scrapbook enthusiast. I included Project Life cards, embellishments, and photo challenges in most if not all of her cases. If the person you are gifting this to is not a fan, it is best to leave that out and use the expense somewhere else. I recommend hounding your local Groupon and Living Social pages for deals. There were quite a few we looked at but passed up for other adventures. Do you know someone that wants to ride a Segway on an obstacle course or get family photos taken at Picture People?

Monday, February 3, 2014

Lego Week: Fun Lego Photos


I am having fun documenting Lego Week and making sure I get a lot of photos so I can scrapbook them. 


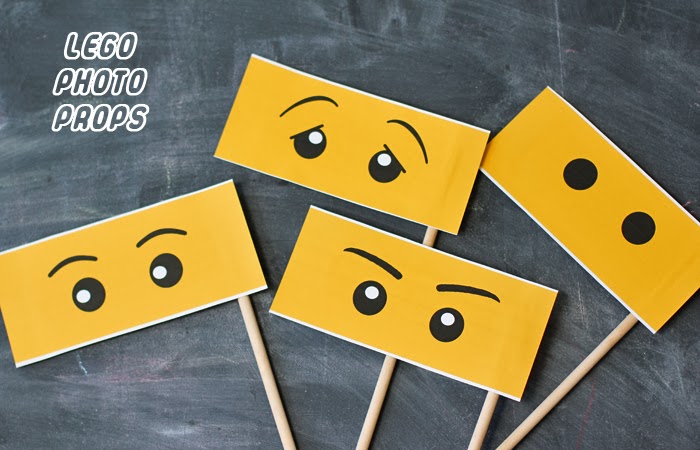
I wanted to make some props for fun and made this Lego head using simple rounded rectangles:


I printed a few and let my son color faces. He came up with some pretty cool monsters! Then we attached them to colored Popsicle sticks with some glue dots.


Here are some links of amazing Lego Photos I've seen around the internet:


Warm Hot Chocolate has some printable Lego eyes so you can still see who's under that face. Adorable!


No Bad Days talks about making this adorable cardboard cutout for pictures.


Free Stylin' talks about these super cool Lego bricks on the wall, bet you could make an entire back drop out of those!


Stop by your local movie theater and see if they have one of these cutouts. We took quite a few pictures here.

Do you have any cool Lego photography ideas? Please share in the comments below. 


Friday, January 31, 2014

Lego Week- Lego Building Challenge Game

I love a challenge. When I was on a cruise last year, there was a Lego Building Challenge activity that we participated in, and I thought it was so fun! 


I decided I wanted to make a Lego Challenge Game of my own for my son and his cousins. First, I collected the scraps of Lego packaging that I saved. I know, I'm silly, but I love to cut out the pieces of packaging I think I can use on a project. I do it with every single super hero tag off of the clothes I buy. Obviously - it's buy a shirt get an embellishment free!


I used a tag punch to punch out some of that yellow cardboard, which is actually a yellow Lego background. I then cut each red square logo and inked the edges. I found some cute kraft envelopes in my stash and decided I'd use those to hold the challenges.


Next, I put red numbers on the yellow tags, punched small holes in the top of the yellow tags, and put twine through the holes. I attached the tags to the yellow journal cards using red washi tape. 


Lastly. I added some challenges. I thought that the kids could go through each challenge and whoever successfully completes each one wins. They can also roll a dice and just complete the one challenge that matches the number, too! The best part about the washi tape is that it is removable and you can make new journal cards with new challenges. 


The challenges in my game are make a garden, build something you find in the city, make an animal, build a house, build a car, train, or airplane, and make a boat. 

Lucky for you, I have created a Free Printable for you to make one of your own!

I hope you enjoyed! If you're looking for other fun Lego games to play, check out Creationary, this printable lego board game, DIY Lego Land Game, Lego Tic Tac Toe, and Lego Hangman

Sunday, January 26, 2014

Lego Week: Creationary Review!!


The geniuses at Lego created a game titled, "Creationary."  It is just like "Pictionary" but you build objects with Lego blocks instead of drawing pictures.  This game is for ages 7 and up and is definitely fun for the whole family!


Inside the box, you will find several shapes and sizes of Lego pieces!  There is a variety of colors as well.  There are also three difficulty levels you can play.  For the easiest creations, choose the single question mark cards to play with. 


Some of these cards and categories are quite challenging.  The categories seem to be transportation, buildings, nature, and tools.  Depending on your skill level with the use of Lego blocks, your results will vary greatly!


 My seven year old made this creation:


He drew a "?" card (which is the easy cards) and rolled the dice that chooses your category.  The dice gave him the "building" category in red.  He thought the greenhouse SOLD plants.  The "man" is working at the register.  Those little buttons are plants :)


Just for fun....I looked on Instagram under #creationary.  You should check that out!  There are so many creative builders out there that really know how to use Lego bricks and build masterpieces.  Way to be crafty!


Personally, I am a fan of the game.  You can only improve on your building skills and people of all ages will have fun playing together.  You can't take yourself too seriously with this game.  I am not as skilled as many "Creationary" players, but it was nice to be creative while spending quality time with my son laughing at how silly I made a row boat look with Lego pieces. Good times and family fun!  Enjoy!