Wednesday, November 26, 2014

Simple Christmas Activity Calendar Banner-Style


This year's Christmas Activity Advent Calendar came together quickly. I was able to get this done in under an hour! 

This was a very simple project:

 1. cut even strips of Kraft Paper
  2. fold in half
3. stamp numbers and stars on the front
 4.write the activity of the day inside
  5. close with Washi tape

 I then pinned them onto some twine that will hang somewhere in the house where my son can take them down each day to read the activity. I am excited to try this more simple version out this year.

A lot of the activities are the same as last year's Activity Calendar, but I changed around a few - we have a couple of events this December and I wanted to try out some new activities. too.


1. Decorate the House and Make a Decoration
2. Write a Letter to Santa (we use the Mega Monkey Mash printable
3. Take a Family Photo
4. Order and Make Christmas Cards
5. String Lights Outside
6. Go Ice Skating
7. Visit Santa at the Company Christmas Party (or the mall)
8. Christmas Family Game Night
9. Make Presents (my son makes small things for his Aunts and Uncles. Last year he painted ornaments)
10. Watch a Christmas Movie
11. Make a Christmas Craft (this year I am thinking of some hand and foot print crafts)
12. Dinner Date
13. See the Light Show at our local farm 
14. Decorate the Tree
15. Bake Cookies
16. Check out the lights around the neighborhood, pick out our favorite house (maybe leave a prize at their door!) 
17. Another Christmas Movie Night
18. Write and Draw a new Christmas Story
19. Christmas Date in the City (we live near Philadelphia)
20. Decorate Gingerbread House
21. Winter Walk in the Park 
22. Make a New Ornament for the Tree
23. Wrap the Presents We Made
24. Cookies and Milk for Santa! And go to sleep early of course.


Do you have any fun Christmastime traditions? Please share! I am always looking for something different to try. 


Monday, November 24, 2014

Elf on the Shelf Calendar

Today I am sharing my Elf on the Shelf calendar I plan to follow for 2014. I have been feeling so busy lately I thought it would just be easiest to make my own calendar so I don't even have to think about what to do each night with the Elf. This is only my second year doing the Elf on the Shelf tradition. Last year I tried to stick to my plans but I didn't always follow through - no big deal. There is no pressure in my opinion - do what you can! 


Our elf is getting just a little mischievous this year, but not making too much of a mess. Do you have any elaborate Elf ideas this year? Or does your Elf like to stay put on one shelf? 

Sunday, November 23, 2014

Christmas Traditions: A Book a Day

I cannot believe Christmas Eve is only a month away. I am in the middle of moving to my first house so I feel a little lost for time! This year I wanted to keep my book tradition simple.


 I did not buy any new Christmas books and I wrapped everything in brown package paper. After I wrapped all the books I stamped the date I want my son to read the book on the paper- simple and fast. He absolutely loved opening and reading the books last year and I plan to keep it going for many years to come. 


I am working on my activity advent calendar next. I'm trying to figure out how to make a quick and simple version. Here is last year's Book list and Activity Advent Calendar. Have you begun working on any projects for the holiday season? 


Monday, September 8, 2014

New Pork Tenderloin Recipe

So have you ever invented a new recipe and just had to share it with the world? This one I made up last night, and I just HAD to share. The flavors are DIVINE! This is a MUST try...trust me:)

Ingredients:

Pork Tenderloin (mine was about 3 lbs)(remove the fat)
one small red onion (chopped)
Real bacon bits (or just bacon and you crumble it up)
Apple (mine was a pink lady but whatever you have works)
Blueberry Honey (reg honey works too but mine happened to be flavored)
McCormicks smoked Applewood Rub
Rosemary
Cinnamon
Tin Foil


Preheat over 350 Degrees. Line Roasting Pan with Tin Foil for easy cleanup. I cut a slit down the middle of the bottom of the tenderloin after removing the fat. I placed a chopped apple, red onion and real bacon bits in the center and drizzled with the blueberry honey. Then i pinned together the sides with toothpicks and flipped it over. Then i rubbed the McCormick seasoning all over top of the pork, sprinkled Rosemary on that and then a small amount of cinnamon over that. Placed a piece of tin foil over the pork to cover it. Since my pork was 3 lbs, it baked covered for 1 hour and 15 mins.

It came out SOOOOO juicy, tender and delicious. Let me know what you think!

Thursday, July 31, 2014

Happy Birthday, Harry Potter!

Did you know it is Harry Potter's Birthday today? My son very recently just saw some of the movies for the first time and has been obsessed ever since, and wants to be Harry for halloween this year. A few months ago, I posted a link to this tutorial which shows you how you can make wands. I had planned on trying it out but didn't get around to it until the kid showed an interest.

They were so easy! They're the perfect size and they are actually very sturdy. Each one is unique and the instructions were simple to follow. I wanted to share our wands that we made with the tutorial by trainsandtutus. We each made our own with dowels ($3.00 for a bag of 20), a glue stick, construction paper, hot glue gun, and paint. I have plenty more to make for my neice and nephews, too!


First we took a dowel and put glue all over the back of a piece of construction paper. We rolled the dowel tightly in the paper and snipped the ends.

Then I took a glue gun and made handles and random designs on the wands. I spun the stick while slowly pouring the glue out to make the handles and i liked how it dripped down the stick as I went.


They dry pretty quickly but I let it sit a few hours just in case. After that, I painted over everything in black acrylic paint. The glue was easy to paint.


 I almost wanted to keep it like that! It looked cool. But I had the metallic paint and wanted to give it a shot so we each painted our own wands.


I loved the tutorial and I love the wands so much I'm definitely making more. It was so simple and the result is unique, fun, and sturdy. Give it a try and share pictures!

Have a great Harry Potter's Birthday!

Thursday, July 3, 2014

Sailor Moon Inspired Crafts

In case I haven't mentioned it before, I love Sailor Moon. I am beyond excited for Sailor Moon Crystal on July 5th, 2014. I thought I'd share some things today that were inspired by Sailor Moon.

First are some gorgeous Sailor Moon inspired earrings that are on sale at our Etsy Shop! 


I wanted to make a quick and easy card. I decided to use my butterfly hole punch and some enamel dots to make the Sailor Scout bows. It came together very quickly, which is perfect for me. Now I just need to add my greeting and it is ready to go!


Another item for sale in our Etsy Shop is this Sailor Moon Inspired Necklace. It goes nicely with the earrings! It reminds me of her scepter in Sailor Moon Super S. 


I love Duct Tape crafts and this one blew me away. It is a Duct Tape Purse inspired by Sailor Moon's outfit. The one below is the one I bought myself, but Dexter's Boutique on Etsy has several more styles! Isn't it so pretty?


It also occurs to me that the Captain American Barrettes we posted before are pretty similar to the wing barrettes that Sailor Moon wears in her hair! A few minor tweaks and you're set!


I'm off to do some more Sailor Moon Crafting because I'm too excited to stop!

Saturday, May 24, 2014

Remembering Loved Ones - Scrapbooking Idea

May and June are big months for our family as we remember our grandparents. Yesterday was my Pop pop's birthday and tomorrow will be my Grandmom's birthday. My Grandpop and Mom mom both have their birthdays in June. Then, of course, there is Mother's Day, Father's Day, and Memorial Day (both my grandfathers served). I wanted to make a special memorial page in my album for them, and when I thought about what I wanted it to include, I thought I'd add in all four of the funeral cards I've been holding on to so I would never lose them. 


To make the page, I used a pocket protector. They come in lots of varieties. This one is by Becky Higgins Project Life. On each side of the page I included a photo of each couple, a 4x6 journaling card with just little random things I remember and never want to forget, and the funeral cards. I didn't tape them down to the 3x4 polka dot cards underneath them so I can pull them out and read the backs in the future. 

I'm happy that it turned out simple and useful, as well as documented some of the things I've been thinking about during these months that remind me so much of them. I'd love to hear how others are storing their prayer cards or remembering loved ones! Share below! 

Monday, May 12, 2014

DIY Eclectic Alphabet Wall Art: Part 5


So let's say you have all of your letters complete-- now what? It took me weeks to get up the nerve to put a hole in the wall and start hanging! Let's hope that the same doesn't happen to you!

Now that we are putting it all together, flip over your letters and give them a good inspection. How many hangers do you already have on the letters and how many do you need to buy? I went to Home Depot and bought a picture hanging kit. The kit had some heavy duty hooks and some light weight options. I used both, depending on what I was hanging. I used the heavy duty hooks on the button-covered "O" and the fabric-heavy "G". The light weight were great for the letters I created from cardboard, the letters with chipboard bases, things like that. I super glued the hooks on the backs of the letter so that I could have a flush attachment (and I didn't have to worry about splitting wood, etc.).

Start by measuring the wall where you would like to hang your letters. In my case, I had a whole wall in my daughter's room to play with. Next, I measured that same amount of space on my floor. Take the letters and lay them out. Consider a few different elements-- spacing (letter to letter and line to line), color story (are there too many of one theme/color together), and if you want the alphabet to read in a logical way (does your eye travel along the line or does it look everywhere at once).


Once you have your letters laid out, you should start translating that to the wall. I started in the upper left corner with the letter A. Put a dab of toothpaste on the hanger hook and press the letter up against the wall. This will easily mark where you need to place your nails. Every so often, you will want to stand back and make sure the spacing you had laid out is what is coming up on the wall as well.


Friday, May 2, 2014

Mo's Chicken and Cheese Empanadas - Cinco de Mayo Recipe

If you want to try something else with queso fresco and the sauce you've made with my previous recipe, try these tasty empanadas. 

Ingredients:

1. Sauce from this recipe (plum tomatoes, yellow onion, jalapenos, garlic, cilantro, salt, and pepper)
2. Corn Mesa - you can buy this in most super markets in the same aisle with the flour. 
3. Rotisserie Chicken - I get one already made at the super market 
4. Queso Fresco 
5. Oil


Recipe:

1. Make the sauce using the first part of this recipe. 

2. Shred the chicken and place into a bowl. You just pull it apart into small half inch pieces. 

3. Add the sauce to the shredded chicken and stir. You don't want it to be too watery from the sauce, but enough so that the flavor is there. 

3. Make the tortillas by following the instructions on the bag. Usually it's a few cups of the flour and some water and you fold it together until you have a ball of dough. You want it to feel soft but not too watery. 

4. Crumble your queso fresco and place in a small bowl.

5. To make the tortillas, you will need either a tortilla press or a flat surface (like the bottom of a pot) and some wax paper. Create a small ball with the dough and flatten it between two pieces of wax paper and the tortilla press or pot and table. Leave the flat circle on the wax paper and put in some shredded chicken and queso fresco. Fold the tortilla in half using the wax paper to help you. Press every part of the edge so that the tortilla closes completely. If your tortilla is falling apart or won't stick together completely, then there is too much filling. Just take it out and try again. Take the empanada off the wax paper and set aside. Make as many of these as you'd like. 

6. Fry the empanadas in the oil until they are a crispy, golden brown. You want to make sure you leave them in long enough for all of the tortilla to cook, otherwise you will have a bit of a mushy inside. Use tongs when handling the empanadas but be sure not to flip them until you can grab the empanada without puncturing it. 

7. Serve with some extra sauce for dipping and enjoy. 

Thursday, May 1, 2014

Mo's Cheese Enchiladas- Recipe for Cinco de Mayo

. It's time to get ready for Cinco de Mayo! I learned this recipe from my son's grandfather who lives in Mexico. Learning how to cook from a man who spoke Spanish only while I didn't understand any of it was quite interesting! The end result is delicious regardless of the language barrier, I promise. 

Warning: I make this salsa very spicy! Ingredients you will need are below:

1. Corn Tortillas (I buy a bag of them soft from the food store, you can also buy the hard ones or use tortilla chips) 
2. 4-6 Plum Tomatoes (depending on size)
3. 1 yellow onion - I prefer a smaller onion but if you love onions, by all means get a big one.
4. 4-5 fresh jalapenos (depending on size)
5. 1 clove of garlic
6. Cilantro (I actually prefer the McCormick Cilantro over fresh for this recipe) 
7. Salt & Pepper 
8. Queso Fresco - This is a soft cheese that you can crumble. You can find it in a lot of Walmart's, some super markets in their dairy section (depending on the area you live), and International & Hispanic grocery stores. I suggest Walmart because it is the cheapest- around $3.00 for the whole round. 
7. Oil if you plan to fry your tortillas. 


Recipe:

1. Boil water in a large pot. Cut tomatoes and onion in half. Cut jalapeno stems off and cut the whole pepper in half, keeping some seeds for spice. If you do not like a lot of spiciness, I suggest getting the seeds out. Avoid touching your eyes and children when handling the jalapenos! Put tomatoes, onion, jalapenos, and garlic in the water and cover with a lid. I keep the veggies in there for about ten minutes. 

2. The best way to know they are done are to check the tomatoes. I put a fork or knife through them and if it slides right off, I know it's done. You'll also notice the skin of the tomatoes is coming off. Peel the skins off of the tomatoes completely. (Be careful! They're hot and you will want to let them cool before peeling.) Put all of your vegetables into a food processor. You can add just a bit of the water from the pot, too, to make it blend easier. Blend the vegetables until you have a smooth sauce. I like to blend for a minute so it is more liquid than chunky. 

3. Pour sauce into a bowl and sprinkle the cilantro, salt, and pepper in to taste. This part really will depend on how spicy you like things. I usually do five shakes of the cilantro and pepper and three shakes of salt. Stir. 

4. If you bought the soft corn tortillas, you can fry them in oil until they are hard. This part is time consuming but tasty and more authentic! Whenever I'm feeling pressed for time I just use chips.

5. Spread a spoonful of sauce on each tortilla or several spoonfuls over your plate of chips. Sprinkle some of the crumbled queso fresco on top. 

6. Enjoy! 

Friday, April 18, 2014

Easter Basket Ideas

Just like stocking stuffers, it can be hard to think of ideas besides candy to throw into an Easter Basket for your little ones. I literally just returned from Target and in under an hour's time, I got everything I needed :)

I have two boys. One is 7 years old and the other is two. Their baskets may have SOME candy. Here is what they are receiving Easter morning...

7 Year old Boy:

Baseball
Baseball batting gloves
Philadelphia Flyers Jersey
Peeps
Lemonade sugar free gum
M & Ms
Captain America Movie (The First Avenger)
MLB Book that you put some collectable stickers in (and 5 packs of the stickers)
Pack of baseball cards
Mario Bros mini figures
Mini Transformers (two of them)


2 Year old Boy:

Sidewalk Chalk (really thick)
Three pairs of socks
Sunglasses
A pack of Huggies swimmies for vacation!
Toothbrush and paste
Peeps
M&Ms
Elmo Learning Doll
Fruit Roll ups
Bubble blowing gun
T-shirt
new sippy cups


Bath toys, books, crayons, coloring books, movies, underwear, baseball caps, sand toys, water guns, face masks, art supplies, crafting projects, diaper rash cream, bubble bath, chapstick, mouth guard for sports, bike bell, gift card, games, card games, slinkies, small figurines and stuffed animals are all good choices as well.

I always wanted a little girl. I feel like their baskets would be easier for me to fill. Here is a list for little girls...

Nailpolish
lipgloss/chapstick
hairbows
doll clothes
Bubblegum Beaded Jewelry
Cds
Movies
dress up items
purse
Stickers
My Little Ponies (other small figurines)
Barbie

What were your favorite items in your baskets growing up? Happy Easter, everyone! Spend this time with your families and enjoy!

Wednesday, April 16, 2014

Easter Tweets

Easter baskets and dinners are all about the treats! I have been looking to Pinterest for inspiration for my Easter Baskets and desserts. I have come across some really cute ideas that I will now share with you. I have small children still and don't want to get all crazy with the sugar, personally. So I need to scale this down to a decision or two ...or three :)

First idea that I am DEFINITELY doing for my niece, nephews, sons and family alike is dipping large strawberries in orange colored white chocolate. They look like cute little carrots! Who doesn't love strawberries and chocolate?!?


What about pretzel sticks dipped in chocolate and sprinkles? Not that big of a deal or anything but still cute and not too sugary.

My son and niece are both two. They would KILL for a marshmellow. What do you think of these cute Peep Pops? I am so in love! I am thinking about maybe making "wands" for them with some fresh fruit and a peep on the top of the skewer.


You can take the same peep...dip in chocolate...and place a mini marshmellow on the back for the tail. :)

Brownies are awesome. Enough said. I have an oval shaped cookie cutter that I can use to cut out egg shapes and decorate them with whatever I want. Love this idea. Simple and cute and very festive!

Me and my older son love this idea...Why? Because it has M&Ms in it. Duh! Making the M&Ms look like a carrot on top of the icing was pretty crafty in my opinion. I like this idea.

A fan favorite would have to be these cute Peep Smores. They are just the right size for small mouths. Graham cracker, Peeps Marshmellow, and a mini chocolate. YUMMY!!!

What about these rice krispie treat eggs? I like that there can even be a surprise hidden in the middle! Fun...and kinda healthy as far as a treat goes :)

SQQQQUUUEEEALLL! These pretzel ducks are super cute and creative! How easy this must be...although...mine may not turn out that nice. I am impatient after all.

So what do you think? If you were to pick from this list, which would you choose?

Happy Easter!!! :) xoxoxoxoxoxoxoxoxxoxo

Tuesday, April 8, 2014

Say No More, Mon Amour! It's Rex Manning Day!

We are a bit in love with Empire Records and I've had the whole movie memorized for years. Today is Rex Manning Day and I wanted to celebrate this movie and share some great music related crafts I've seen.


Here is a tutorial on how to make a notebook from an old record. I love this idea and tutorial by Stars For Streetlights. 


Next is this cool wristband also made from a record by College Candy. I've seen a ton of jewelry made from records and guitar strings and picks- so cool!


I love this coin purse made from an old cassette tape by chezlin.  I also saw a notebook made with a tape- very cute! 


DIY Fashion  shows you how to make this wallet, too! 


If you have one of those pick punches you could cut picks out of lots of different materials! Shannon once covered an entire scrapbook with them for me. I love this guitar pick table. I can think of a lot of things I'd love to cover in guitar picks. 


DIY Budget Girl shows you how to make a shelf out of an old guitar. I've seen lots of these online for sale and just think its a great idea if I ever find a cheap guitar at a thrift store.


I've seen a lot of tutorials for melting records into bowls. Here's one from Instructables.com. I have a few of these and I use them around my craft table. 


I hope you are inspired to make some music related projects - I know I'm dying to try out a few of these this weekend! The time to hesitate is through. 


Thursday, April 3, 2014

How to dress like Captain America


Looking for inspiration in fashion is something everyone does. Sometimes, you just don't realize you are doing it. Today, I am inspired to dress like the one and only Captain America...Aka Steve Rogers. I have been waiting for the new movie to release and am super excited the time has almost come. I am currently piecing an outfit to wear to the movies when my husband take me on a date with the kids to see it.

First of all, if you never heard of Captain America, you must be living under a rock. But in case you are unsure of who he is, he was a soldier who during WWII went through an experimental procedure which transformed him into a Super Soldier. He is practically unstoppable and super sexy! His most prized possession must be his trusty shield because that thing has saved his life more than a few times! He never leaves home without it.

When I made my first Super Hero inspired necklace, it was my Captain America necklace. I was inspired by his shield the most and hope that you can see how I incorporated the shield into the concept of the design.
When planning my outfit, I first think of the color scheme I want to bring in from my inspiration. Captain America is TOTALLY 100% Americana so obviously red, white and blue come to mind immediately. I would also use silver as it is metallic and reminds me of his strong shield. Designs to consider would be stars, stripes and circles.


Boots would make the most sense to wear with the outfit because he is a soldier and soldiers wear boots. I would even love to see a pair of Doc Martin Red combat boots here. If you like wearing tall boots, I would wear jeans under brown boots.


When syling yourself while being inspired by something, you really need to remember your details and accessories. Nail art is super trendy right now. I am in no way a nail art artist, but it doesn't mean I can't have fun! I would keep the color scheme the same as the clothing. Red, white, blue and silver. Personally, I love glitter and would definitely throw silver glitter into the nail design. Heck, maybe even some stars! Since I am a beginner, I think I will try doing a white nail with red stripes, a blue nail with white dots, a silvery glitter nail, a star nail and lastly, captain America's shield (if i can).


I am totally in love with styling this outfit with a circle purse. It is a perfect nod to his trusty shield. Would you agree?


Wednesday, April 2, 2014

Captain America Week: Captain Inspired Barrettes

Want to make some cute hair accessories for your little ones (or your not-so-little ones)?
All you need is a few scraps of felt, a hair clip, and glue or a needle and thread.

Step 1. Gather your materials. I like to upcycle and use my scraps so often my project is determined by what I have on hand. These barrettes take barely a few inches of material. I used felt but you could use any fabric (though I prefer those that don't unravel easily).

Step 2: Cut out your object. For the wings, I sketched a design on paper and used that as a template. On the shield, I traced a small circular children's toy for the largest circle and did a free hand version for the smaller circles and the star.

Step 3: Once you have the pieces ready, use your glue or thread to tack them all together and attach the hair barrette. Try out the clip and see what you think. Enjoy!

Tuesday, April 1, 2014

Handmade Captain America Greeting Cards

My Fiance's birthday is this weekend and I'm just in luck that Captain America Winter Soldier comes out this weekend, too! He loves superheroes even more than I do so the birthday date is all planned. 


My son and I worked together on the cards, using circle punches and star punches to make the iconic shield. 


I haven't always loved making my own cards, but when they are as simple as this it is great and you save yourself $4.00. 

The second card I made was also simple and fast. I just cut different sized rectangles with my scraps from the shield and used another star. It looks a little like the old school Captain America costume. 


If you have never tried card making before, I suggest you give it a go with simple shapes like these ones. 


Monday, March 31, 2014

Captain America's Shield - Kid's Craft


Getting Captain America Week started with a really simple Kid's Craft. We wanted to make an easy Captain America shield that the little kids could do that wouldn't take too long after dinner. 

We gathered plates (mine were plastic but I suggest paper), ribbon and tape, some paint for the older two kids and construction paper for the little one. I already had three white stars cut out from a die-cut machine. I loosely sketched some circles for them to divide the colors they could use. 


All I used for the back was some ribbon and tape so they could hold their shields up. Simple enough! 


Stay tuned all week for some more Captain America related crafts! 

Saturday, March 29, 2014

Fun April Fool's Day Prank

My 4 year old is learning all about April Fool's Day jokes. Last year, he played a mean one on me by hiding around the car and I really couldn't find him for a few minutes putting me into panic-mom-mode. This year, I wanted to show him that you can have harmless April Fool's Day fun instead of scaring your own mother to death! 

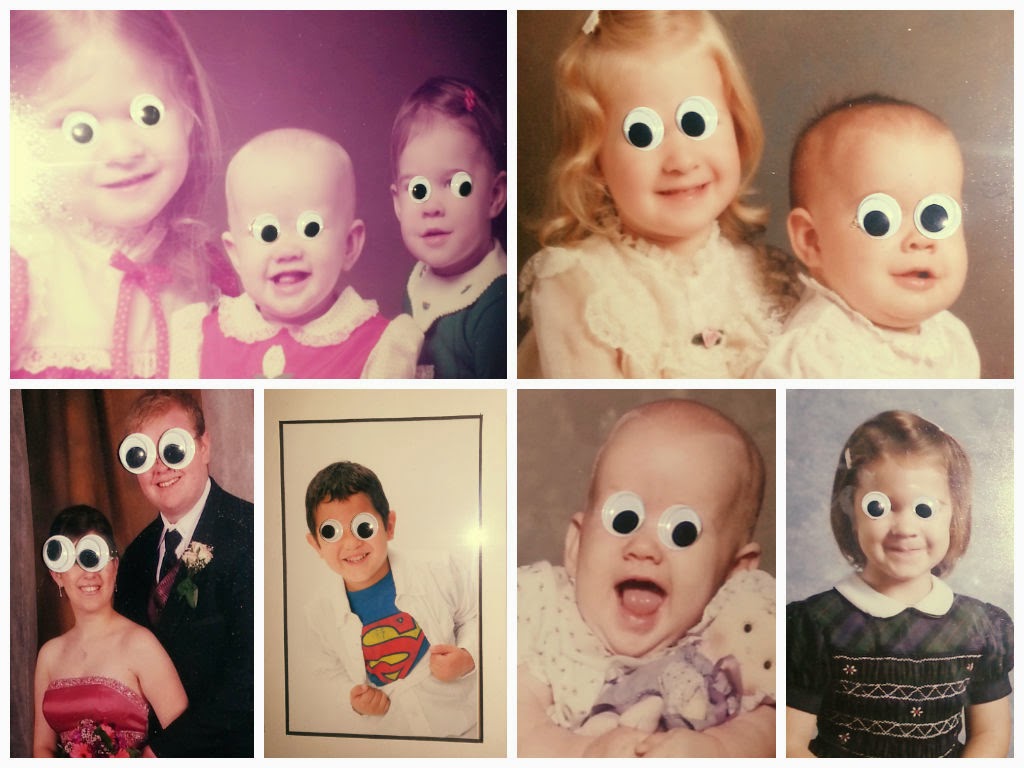
I had a ton of googly eyes from previous crafting and thought we could put them to good use. We started by putting them all over Nana's desk - the mouse, keyboard, stapler, drawer, coffee maker, etc. Then my fiance suggested we use the rest on the picture frames we have going up the staircases. Take a look:


My son had a lot of fun placing the eyes on the pictures and picking which ones would go where. Now he is patiently waiting for Nana to get home so she can be surprised by all the funny pictures. 

Now I'm planning a good harmless prank to pull on him! What are you doing this April Fool's Day?