Saturday, November 23, 2013

Christmas Book Countdown and Activity Advent Calendar

I'm excited to share some things I'm doing this year for the Holiday Season. In the past few years I've noticed that Christmastime wasn't the same as when I was young. It feels like Christmas sneaks up on me and I'm thinking, "is Christmas seriously this week? Definitely doesn't feel like it!" Then I feel panic and stress trying to cram traditions and shopping all in one week. This year I have a plan. I am going to make every day special by making some advent calendars! I've planned a Book Countdown and an Activity Advent Calendar. I'm also doing Elf on the Shelf for the first time this year.  I'm going to photograph everything and make a scrapbook album of the holiday season. 

Book Countdown:


Beginning Thanksgiving night, we are going to read a holiday book each day until Christmas. I gathered all of my Christmas books and went to the dollar store to purchase a few more. 
I wrapped all of the books and using a paper punch and some extra Thickers (alphabet stickers), I made tags so you can clearly see which books go with each day. I then put all of the books on an empty book shelf in the living room where the tree will go in December. I think my son (4 yrs) will really enjoy it and he's already been staring at the packages wondering which book will be first! 

Here is the list of books I have for this Book Advent Calendar: 

1. Elf on the Shelf
2. Thomas' Night Before Christmas
3. The Polar Bear Express
4. Sesame Street Snowy Day
5. The Sweet Smell Of Christmas
6. Frosty the Snowman
7. Un Nino Dios 
8. Woody's White Christmas
9. Disney's Christmas Dreams
10. The Poky Little Puppy's First Christmas
11. If You Take a Mouse to the Movies
12. Rudolph the Red Nosed Reindeer- Santa's Big Day
13. Land of Snow and Ice
14. Dora's Christmas Carol 
15. The Little Christmas Elf
16. King of the North Pole
17. Jingle Wheels
18. Guess Who's Coming to Santa's for Dinner?
19. The Animals' Christmas Eve
20. Dora's Counting Christmas
21. Elmo's Night Before Christmas
22. Beauty on Ice
23. The Christmas Story
24. I've Seen Santa! 
25. Rudolph the Red Nosed Reindeer - Rudolph Helps Out
26. Dinosaur VS Santa
27. The Night Before Christmas


For the Activity Advent Calendar, I used a ton of my Christmas Scrapbook Stash that has been sitting around begging to be used. I also used a lot of envelopes. Basically, I came up with different activities that we can do throughout December, starting on the first. Some of the activities are small, free, and don't require leaving the house. Others are events that we've planned or places to go. I'm excited to give this a try and really make it feel like Christmas all month long!

Here is the list of Activities:


12/1- Decorate the House and Make a Decoration
12/2- Write a Letter to Santa using the Mega Monkey Mash Printable
12/3- Take a Family Photo
12/4- Make/Order Christmas Cards 


12/5- Hot Chocolate Day
12/6- Make a Christmas Craft 
12/7- Visit Santa at the Mall
12/8- String Lights Outside


12/9- Christmas Family Game Night
12/10- Watch Christmas Movie
12/11- Dinner Date 
12/12- Go Ice Skating


12/13- See the light show at the farm
12/14- Decorate Tree (we get a real tree so we do this in the middle of the month)
12/15- Bake Cookies
12/16- Check out the Lights in the Neighborhood


12/17- Watch Elf
12/18- City Date 
12/19- Christmas Carols and Dance Party
12/20- Decorate Gingerbread House


12/21- Winter Walk in the Park 
12/22- Make a New Ornament for the tree
12/23- Wrap Gifts
12/24- Cookies and Milk for Santa

I hope this gives you some ideas to make your holiday special this year! Do you have any holiday traditions? 

The Day of the Doctor: Roundup!

Greetings, Whovians! I, like so many others, will be tuning into the BBC tonight to view the Doctor Who 50th Anniversary Special and kick off to the final episodes of Number 11 (Matt Smith; tears).

In honor of the mad man in the blue box, I did a Doctor Who Crafty Round Up!


Do you cross stitch? This is a wonderful combo of Mad Men and the Eleventh Doctor! I'm geeking out!


Here we go-- one you can make with the kids! Crayon art has been seen all over the internet and I have still yet to try it! I probably would give it a go for my very own Tardis in the house...

The Fourth Doctor was famous for his long knit scarf. See how cute it is in knee-sock form?

Oh, how posh! A Tardis card Tutorial!! You can make your very own blue box that is bigger on the inside. I'm going to have to try my hand at this one.

Perler Beads can be used to make some awesome Christmas tree ornaments! In fact, she has a WHOLE WHO-TREE featured on her blog! Fantastic!

Ahhhhhh! And my mind is melting!! Also on Doodle Crafts, Natalie has made a family of Doctor Who stockings!! There is even tutorials so please head on over there if you are looking to celebrate the holidays, Doctor Who style!

For the crochetting set, there are a ton of versions of the Doctor and his feidnish Foes.


You can even convert your hook into a sonic screwdriver or a Tardis!


And this is just a taste of what is out there! Go forth and craft in honor of the man that has saved the Earth a hundred times over for 50 years, The Doctor!

Tuesday, November 19, 2013

Free Printable - Letter to Santa

My daughter will be one and a half this Christmas. Last year, we had a fun time playing with the balls on the Christmas tree and ripping paper, but she didn't have a clear understanding of the holiday and all it entails.

Now, I am not going to suggest she understands about elves, reindeer, or giving but she certainly knows who Santa is-- she picked out his picture in a magazine and we didn't even teach her that association!

Being the aunt of many nephews and a mother, one of the most popular questions I have come across over the past two weeks is when Lorelai's Christmas List for Santa will be ready. For fun, I made a free printable to share with all of you so you can also get your child's list together and sent out in the mail to the North Pole.

https://drive.google.com/file/d/0B-CfETec_i_scGw0TmNoNmFGRUk/edit?usp=sharing
Click the image above or you can go to the link here to download your own Letter to Santa.

I made sure to include a note about donating to another child in need this holiday season so that I could start instilling that idea in Lorelai at a young age. Every year, I will make sure she participates in Christmas Giving (as well as giving throughout the year). It is something that my family taught me and certainly something that we will be carrying on as a family together.

I love holiday traditions! What is your favorite? Are you going to start a new one this year?

Monday, November 18, 2013

What's New!


 We've been quite busy working on some great crafts for our store in our free time. Here is a peek at some of the things we've been doing!

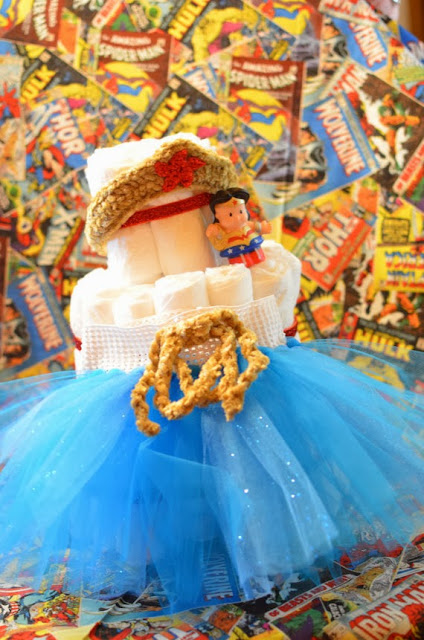
I've been working on diaper cake designs. Here is one Hero Diaper Cake inspired by Wonder Woman. 


The tutu with lasso and tiara were made by Shannon. They would look adorable on a little baby girl! I think Diaper Cakes are great for baby shower decorations. Every diaper can be used, too.  I used size 1 Pampers Swaddlers.  Each cake is custom made and the accessories may be different, depending on the inspiration and size. 

Shannon has been working on some crochet hats. She's made Ninja Turtle hats, Thor helmets, and the Wonder Woman accessories that go with the diaper cake. 


You can buy the Ninja turtle hat or pattern at our Etsy store. My son wears his all the time and we get compliments everywhere we go! 
  

Caitlin has been working on some beautiful jewelry pieces. Here is a Necklace inspired by Wolverine. I just love how it looks like his claws!

 She's made more Sailor Moon earrings and they are amazing. Sailor Moon is definitely my childhood favorite. 


She's also made this gorgeous faux pearl multi-layered necklace with a pod of crystals. These products will be available at our Etsy store soon!


Check back for updates as we continue to grow and come up with new ideas. Leave a comment if you're thinking of a hero we haven't featured! Personally, I'm hoping for some Quail Man. ;) 

Friday, November 15, 2013

Thor Week - Crochet Thor Helmet


I was channeling some classic Thor this week in making this crochet helmet for my nephew. The white wings on the grey hat is reminiscent of the comic book version of Thor.


The hat itself took a few hours to work up. I added texture to make the hat interesting-- like a helmet! I toyed with a few different wing styles before creating one that I liked enough to make a second for the pair. The white wings have been starched to stand up.

Tonight, I am starting an all silver version for adults to see how it turns out. once I work out the kinks, expect a copy of the pattern in our shop!

Thursday, November 14, 2013

Thor Week- Even More Thor Inspired Crafts

Hello! Mo here with another Thor Inspired post. Hope everyone is having a great Thursday! (Thorsday?) Anyway, today I wanted to share some additional crafts I did this week that were fairly quick and lots of fun!

First, I searched the web and found this free Thor Cross stitch pattern! 


You can find the PDF download of this pattern by avozika on this website. Since I haven't cross stitched in years, I think beginners could definitely do it. So if you ever wanted to try cross stitching, now is the time! Here is what it looks like completed:


 I stitched this entire pattern while sitting in the dentist's waiting room and watching my favorite prime time TV shows this week. I like to multitask. I still need to put it in a frame and I'm considering stitching a quote underneath just for fun. 

Also this week I made this picture frame: 


I used a wooden frame from my local craft store and some old comic books I found in a thrift store. This was a "teens +" version of Thor. I cut up some interesting parts of the comic book and rearranged them on the picture frame until I liked what I saw. 

Then I got the Mod Podge out! 


This stuff is great. I was able to glue everything down with it. Then, using a paint sponge brush, I put a thin layer of the mod podge over the top and took care along the edges. I put a couple layers on and let it dry. Then I painted the sides and back of the frame black with some help from my son. We like to paint together.

After the paint was dry I sprayed some acrylic sealer on top to make sure everything stays put. The most time consuming part of this project was waiting for everything to dry, but honestly the paint and mod podge dried within minutes. This one is definitely an easy and fast project and I still have plenty of pages from the comic book left to make another!

Thanks for reading, now get crafting!

Wednesday, November 13, 2013

Thor Week - By Odin’s Beard: a tutorial for DIY Shrinky Dinks!


This is a neat tip I had picked up a few years ago. I have always been money-conscious (a trait I inherited from my dad) so the opportunity to upcycle something I would have normally thrown away was very appealing!

Materials Needed:
Permanent Marker(s)
#6 Recyclable Plastic
Hole Punch
Aluminum foil
Cookie Sheet
Scissors
Oven


1.       Take your recycled plastic and clean it (or if it is new, you can skip this step). The #6 plastic is typically found at supermarket salad bars and take out.

2.       Using a permanent marker, draw a design. You aren’t limited to black so have some fun with it! I drew a free-hand version of Thor's Hammer while the kids were coloring their own art.


3.       Cut out the image you just created using scissors. Here, you will want to decide if you want to leave a clear border around your object or if you are going to cut right up to the image edge. There are benefits to each! In some cases, you can punch your hole for the charm jump ring in the clear and not disturb your image. In other cases, it might not bother you or the design to punch a big o’ hole right in the center of Batman’s head.

 4.       Now, decide where you want to place your hole and punch it out with a hole punch. You can skip this step if you aren’t making a charm. Alternately, you could put two holes in the center of your charm and make a custom button. Oh! Wouldn’t your little one look adorable in a shirt with buttons you have replaced with ones you made yourself?!?? If you decide to go to clothing route, make sure you seal the buttons! You don’t want the marker to wear off after continuous washings.

5.       Preheat your over to 350 degrees. Take a cookie sheet (the non- insulated kind) and cover it with aluminum foil. This is mainly to protect your cookie sheet for future cookie baking adventures!

6.       Place your charms on the cookie sheet with the drawling side up. Place the sheet in the oven for 2-3 minutes. Keep a careful eye on the baking—this is the fun part! At first, the designs will curl up and you will start to worry—“Oh, no! Did I do something wrong?!?” DON’T JUMP THE GUN! Keep those bad boys in there until you see the plastic straighten itself back out. When you think they are flat again, pull out the sheet (using a glove) and quickly look them over. If you have any bumps, now is the time to fix them. Take something wooden (I use a spoon handle) and press the area flat. Because you might need to fine tune the flat-ness, I only like to bake 2-3 at a time. The great thing is—since they only take 3 minutes to bake and are fun to watch, making them in mini-batches isn’t a big deal. 

 7.       Your creations should cool for a minute or two but then are ok to handle. You now have smaller, thicker, sturdier versions of your artwork that you can use on a scrapbook page, on a charm bracelet, on a shirt… the possibilities are endless!

Tuesday, November 12, 2013

Thor Week - Crash design lesson on the God of Thunder Jewelry

Making the sexy Thor inspired jewelry was one of the most fun pieces to design for me.  I am Irish and my name is of Gaelic decent.  I have always been a fan of the Celtic knot and even incorporated it into my wedding.  My son received a blessed Trinity knot necklace from me and my husband and he carried a Love Knot cross-stitched onto the ring bearer's pillow.  My husbands, wedding band also has a Celtic design.  After seeing the movie "Thor," I was inspired by the Celtic knot that glowed on his favored weapon of choice...his hammer.  


When designing the first Thor necklace, I made sure to capture the beauty of the Celtic knots while staying true to the colors of Thor's costume.  Incorporating the wings in the design was a must. They represent the wings on the sides of his helmet.


The second necklace I made featured more Celtic knots but also focused on the beauty of that design with the large focal point being obviously the knot pendant.


The earrings stayed true to Thor's colors but also reminded me of the shape of the hammer.  The lightning was a powerful statement to have dangling at the bottom.  I chose to make a pair with the lightning and without the lightning depending on the taste of the wearer.


The final piece designed in the Thor likeness is the silver charm bracelet.  Again, the Celtic knot is highlighted in the charms but also a crown and a shield showing that he is also a prince as well as a warrior.


All of these beautiful designs can be purchased here in our store.  Let us know what you think.

Monday, November 11, 2013

Thor Week - Kid's Craft - Thor Hammer - Mjolnir

We are all so excited that Thor 2 came out last weekend! We have taken the opportunity to make a few projects inspired by this beloved and immortal hero. We are going to share these projects with you this week! 


Today, I am going to show you a quick and easy kid's craft. Our participants were 7 and 4 years old. 


We began by gathering a few materials found around the house. This included Aluminum Foil, toiler paper rolls, scotch tape, empty tea boxes, gift wrap ribbon, and some glue and a hold punch (not pictured). 


I started by having the kids wrap the tea boxes (or any small box) with the aluminum foil. I had the not-so-shiny side showing so it seemed more like the metal in Thor's hammer. 


Next we cut a hole in the box and aluminum. We taped two toilet paper rolls together and added glue around the edge on the top. 


Hold the rolls down firmly and wait a minute for the glue to dry. 


Next, we used a hole punch to punch a hole at the bottom of the tube. We looped a ribbon into it to mimic the wrist loop on Thor's Hammer. Then we used the ribbon to wrap around the tube. 


Here is the completed project and happy kid who loves to play with his masterpieces. This was a fast project (15-20 minutes) that kept the boys busy and peaceful- bonus! 

We also had the kids do some coloring. Who doesn't love coloring?  They colored pictures of Thor that were printed from this website. They have a ton of great printables there!


Stay tuned for more Thor-inspired crafts this week as we celebrate the return of The Immortal Avenger in his sequel!