Showing posts with label Upcycle. Show all posts

Thursday, February 6, 2014

Lego Week: DIY Lego Key Holder

I love the idea of adding fun into your home decor. I have seen a few different key holders around the internet including one that is sold by Lego and thought... I can do that!

For this Lego project, I started tinkering with a few of the Lego pieces we picked up at the store last week. My partner came upon me and demanded he participate. Ian has been an avid Lego fan since he was a small child.

To make the plate, we used a Lego Blue Building Plate as the base. Next, Ian designed the door. He used pieces we had purchased at the Lego store from the brick wall to make a flat door, trim, and doorknob brick.  The key, he used several bricks without the bumps on the top to give the feeling of a sleek piece of metal.

You can approach this at several levels of DIY. In our case, we made key chains with the Technic Lego block that are designed with holes in the sides of the bricks. I bought a package of key rings at Micheal's-- done! You could use a drill and put a hole in your own standard Lego brick too! Here, you would choose a good place for your ring, drill, and add in the key ring. On an even simpler level, you could buy a ready-made Lego man key chain available in the stores and online.

Using a drill, make a whole in the Lego plate close to each corner and screw into the wall by your front door. Alternatively, you could use mirror hooks to hang the plate if you are shy about putting holes into your precious Lego pieces.

Ian was so excited about the project, he pulled out a notebook and started sketching an "even better" key holder for our home. I see a special online order in my future-- and I promise to post the results of that adventure as well.

Wednesday, January 22, 2014

DIY Eclectic Alphabet Wall Art: Part 1


Let me have an honest moment with you, readers. I have lived in my house for over 5 years now and though I love DIY and art, there is not a single nail in my walls. It is a point of frustration for me that I am determined to remedy soon (and more on that later!).

When I was pregnant with my daughter (2 years ago), I was inspired by all of these lovely images I found all over the internet of eclectic alphabets hung in children’s rooms. My partner is not a fan of eclectic style but to my shock and amazement, he told me it was a great idea when I said I wanted to make letters to coordinate with the baby’s room. Honestly, I think that deep down he thought it would be a project that I would never finish. Well, joke is on him now! I applied my last coat of purple to the final letter last week and hung them all on the walls of my daughter’s room yesterday!

There is some great variety here so take a look! I would love to tell you how I made them—it might inspire you to create a few of your own as well. You don’t have to do the whole alphabet. Consider doing your street name in the front entrance, your family name in your living room, your child’s name in their bedroom, or your favorite creative word in your craft space!


A: Picked this one up at Home Goods. It was originally silver and designed to sit on a shelf. A healthy coating of green and the latticework of the metal shines.


B: I bought the letter and the canvas at Michael’s. The canvas is a part of a 10 pack of 8x10 value canvases. I wrote the uppercase B in pencil lightly and free hand then filled it in with purple acrylic paint. The lower case B was white and I spray painted it green.


C: My mom made this one! First, she used Spellbinder's to cut the flowers out of paper. Taking chalks, she colored the petals and adds a pollen accent on the middle with a Copic Marker. The flowers are hand painted with stickles on the inside for the touch of glitter every little girl needs.


D: This is a cardboard letter I got in the clearance section of Michaels—25 cents! I painted the letter purple then took purple glow-in-the-dark puffy paint and drew the scrolling design by hand. This letter was inspired by this pin!


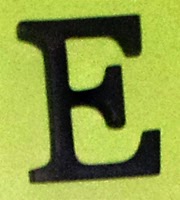
E : This is a pretty heavy pre-made letter. I bought it at Marshall’s. It’s a dark brown that I did not alter in any way. 


F: This one was fun to do! I started with two different weights of jewelry wire, a print out of the letter “F” in a font that I liked, and a can of purple spray paint. Bend the heavier weight wire to trace the outline of the letter that you have printed. Overlap the ends and twist off. Mine ends in the straight, flat area of the top of the F so that it is in a strong place for support. Next, twist and wrap the thin wire in and around the letter outline. I was going for a "scribbled" kind of look but you can certainly wrap in a more uniform pattern. This step, I used several lengths of wire so that the wrapping was easier. Just do your best to tuck in any sharp ends. Next, spray paint the letter whatever color you desire. This letter was inspired by the string art you see all over the internet these days... just with a different nod to it!


More letters (and better pictures, I swear) to come! Stay tuned...


Link to Part 4 (Letters T to Z)Link to Part 5 (Arranging and Hanging)
 

Wednesday, November 13, 2013

Thor Week - By Odin’s Beard: a tutorial for DIY Shrinky Dinks!


This is a neat tip I had picked up a few years ago. I have always been money-conscious (a trait I inherited from my dad) so the opportunity to upcycle something I would have normally thrown away was very appealing!

Materials Needed:
Permanent Marker(s)
#6 Recyclable Plastic
Hole Punch
Aluminum foil
Cookie Sheet
Scissors
Oven


1.       Take your recycled plastic and clean it (or if it is new, you can skip this step). The #6 plastic is typically found at supermarket salad bars and take out.

2.       Using a permanent marker, draw a design. You aren’t limited to black so have some fun with it! I drew a free-hand version of Thor's Hammer while the kids were coloring their own art.


3.       Cut out the image you just created using scissors. Here, you will want to decide if you want to leave a clear border around your object or if you are going to cut right up to the image edge. There are benefits to each! In some cases, you can punch your hole for the charm jump ring in the clear and not disturb your image. In other cases, it might not bother you or the design to punch a big o’ hole right in the center of Batman’s head.

 4.       Now, decide where you want to place your hole and punch it out with a hole punch. You can skip this step if you aren’t making a charm. Alternately, you could put two holes in the center of your charm and make a custom button. Oh! Wouldn’t your little one look adorable in a shirt with buttons you have replaced with ones you made yourself?!?? If you decide to go to clothing route, make sure you seal the buttons! You don’t want the marker to wear off after continuous washings.

5.       Preheat your over to 350 degrees. Take a cookie sheet (the non- insulated kind) and cover it with aluminum foil. This is mainly to protect your cookie sheet for future cookie baking adventures!

6.       Place your charms on the cookie sheet with the drawling side up. Place the sheet in the oven for 2-3 minutes. Keep a careful eye on the baking—this is the fun part! At first, the designs will curl up and you will start to worry—“Oh, no! Did I do something wrong?!?” DON’T JUMP THE GUN! Keep those bad boys in there until you see the plastic straighten itself back out. When you think they are flat again, pull out the sheet (using a glove) and quickly look them over. If you have any bumps, now is the time to fix them. Take something wooden (I use a spoon handle) and press the area flat. Because you might need to fine tune the flat-ness, I only like to bake 2-3 at a time. The great thing is—since they only take 3 minutes to bake and are fun to watch, making them in mini-batches isn’t a big deal. 

 7.       Your creations should cool for a minute or two but then are ok to handle. You now have smaller, thicker, sturdier versions of your artwork that you can use on a scrapbook page, on a charm bracelet, on a shirt… the possibilities are endless!