Showing posts with label Painting. Show all posts

Monday, May 12, 2014

DIY Eclectic Alphabet Wall Art: Part 5


So let's say you have all of your letters complete-- now what? It took me weeks to get up the nerve to put a hole in the wall and start hanging! Let's hope that the same doesn't happen to you!

Now that we are putting it all together, flip over your letters and give them a good inspection. How many hangers do you already have on the letters and how many do you need to buy? I went to Home Depot and bought a picture hanging kit. The kit had some heavy duty hooks and some light weight options. I used both, depending on what I was hanging. I used the heavy duty hooks on the button-covered "O" and the fabric-heavy "G". The light weight were great for the letters I created from cardboard, the letters with chipboard bases, things like that. I super glued the hooks on the backs of the letter so that I could have a flush attachment (and I didn't have to worry about splitting wood, etc.).

Start by measuring the wall where you would like to hang your letters. In my case, I had a whole wall in my daughter's room to play with. Next, I measured that same amount of space on my floor. Take the letters and lay them out. Consider a few different elements-- spacing (letter to letter and line to line), color story (are there too many of one theme/color together), and if you want the alphabet to read in a logical way (does your eye travel along the line or does it look everywhere at once).


Once you have your letters laid out, you should start translating that to the wall. I started in the upper left corner with the letter A. Put a dab of toothpaste on the hanger hook and press the letter up against the wall. This will easily mark where you need to place your nails. Every so often, you will want to stand back and make sure the spacing you had laid out is what is coming up on the wall as well.


Monday, March 31, 2014

Captain America's Shield - Kid's Craft


Getting Captain America Week started with a really simple Kid's Craft. We wanted to make an easy Captain America shield that the little kids could do that wouldn't take too long after dinner. 

We gathered plates (mine were plastic but I suggest paper), ribbon and tape, some paint for the older two kids and construction paper for the little one. I already had three white stars cut out from a die-cut machine. I loosely sketched some circles for them to divide the colors they could use. 


All I used for the back was some ribbon and tape so they could hold their shields up. Simple enough! 


Stay tuned all week for some more Captain America related crafts! 

Sunday, March 23, 2014

DIY Eclectic Alphabet Wall Art: Part 4

Welcome back to our Alphabet Wall Art tips and tutorials. Today, we will run thru letter T to letter Z. I made a few of these letters from stratch so I will walk you thru that process as well!

T: I paid $2.29 on Amazon for this blue letter T. I painted the top green. Next, I painted the edge purple and glow-in-the-dark purple over that. With the lights out, the outline glows on this letter making it pretty cool!

U: The letter U was made by my sister-in-law, Sarah. Sarah started with a wooden letter and painted it royal purple. Taking a Martha Stewart punch, she cut out flowers of white paper that she had sponge painted with our green. She glued down the flowers in clusters and added Dewdrops. Next, a small letter U bought in the Micheal's clearance bins was glued to the front to finish it off.


V: I made the letter V from a Cheez-It box. I consulted the tutorial on Green Zebra Crafts for hints but mainly made up my method as I went. First, I printed the letter V I was trying to mimic from my computer. The letter is 11 inches wide so it took put most of my paper. First I removed the sides of the box and put them to the side so I only have the front and back of the box. We will be using those pieces later. Next, I traced and cut the front and back of the letter. Using the sides of the box and masking tape, I ran the cardboard along about a half inch inside of the edge of the letter. You can get an idea of the inset from the image below. I will admit-- I used alot of masking tape on this project. I opted not to decoupage or use a wet glue since I was working with cardboard.  After the letter was created, I painted it dark purple and used Elmer's glue to adhere the glitter. I sealed the letter so there wouldn't be glitter all over my house in the coming years.


W: My sister Caitlin made the letter W-- White Wedding. Caitlin had just been married the year before and I believe she was still feeling inspired. The letter was purchased already painted white. Caitlin used hot glue to attach the lace "veil" and "garter". To the garter, she also added a white ribbon and flower. Next, she took a cluster of purple ribbon roses withe a spray of pearls. Using Glossy Accents, Caitlin attached a pearl necklace using scrapbooking half pearls.

X: I bought the fabric covered X on Amazon as well (again for $2.29). The edges of the letter are green with white polka-dots but the front was blue and white gingham. I used acrylic paints to make the front of the X all green and added white dots by hand.

Y: Using a chipboard letter that is 11x11, I chose to yarn wrap the letter Y. I chose a lovely variegated purple yarn by Patton's. To keep the ends from falling off of the rounded edges of the letter, I added a bead of Elmer's glue to each end on the back side.

Z: I made the letter Z using cardboard and masking tape. Again, I used a cereal box, removed the sides of the box and cut out the front and back of the letter from the front and back of the box. "More masking tape!", I cried as I used the cereal box sides to give my letter a uniform thickness all around. For this letter, I made the sides and front edges meet in a smooth transition. I painted the edges purple and the front white. Next, I took my scrapbook supplies and pulled out all of the green, purple, brown, and white letter Z's that I had. It probably does not surprise you but the letter Z is not one that I use often so I had many options to choose from. I glued and layered the Z's on in three different occasions so that I could let the glue dry and add the dimension I wanted.


More to come on making your own eclectic alpha wall!

Wednesday, February 26, 2014

DIY Eclectic Alphabet Wall Art: Part 3


Welcome back to another installment of DIY Eclectic Letters. Today, we'll talk about letters N to S.


N: Now, before you go thinking that I know how to have a good party, please let me say that I do not drink wine. My friends and family save up their corks for my craft projects. Now that that is out of the way, I started with a brown chipboard letter I had from my scrapbooking. The letter is just shy of 12 inches tall and looks super cute in a book. I used hot glue and adhered the corks starting that the bottom of the letter (always start where there is a straight area to establish a pattern). I used artificial corks from two different wine companies to keep the size and shape as uniform as I could.


O: This letter was made by my mom, Lorelai's Nana! Mom and I are button hoarders so we had a large amount of buttons to choose from for this project. I bought the letter from the clearance section of Babies R Us -- $0.98! It was pink when we bought it so I used the spray paint and made it purple. Mom used Glossy Accents to attach the buttons. For the buttons that had shanks (posts sticking out of the back so they can be attached to clothing), we used a removing tool but scissors that you don't mind making dull work as well. We layered the buttons for some extra fun!


P: I bought a pick punch a few years ago to make a Christmas present. I took old gift cards I had and punched out a handful of picks. I painted the picks that were not in coordinating colors with a variety of acrylic paints. This letter also comes from the Babies R Us clearance section. I was worried about the two letters being right next to each other but with the different decorations, you can barely tell they are the same font.


Q: The letter Q was purchased as plain wood from the Home Depot. I painted it purple.
R: R was purchased from the clearance section of Target. The letter was already a dark brown, which fits well into my color scheme. This letter is actually intended to stand on a shelf but it also hangs quite nicely.


S: The letter S is a wooden piece from A.C.Moore. I painted the gradient fade by hand. I started with the dark purple in the bottom, dipped my paint brush and moved the paint along as far as I could. I added a little white to the paint I'd poured and continued on (in the curve area at the bottom). More and more while was added, moving up the letter. When I go to the middle section, I changed to a new brush to ensure I wasn't going to get dark streaks from before. The lightest color at the top was also painted with a separate brush. I next glued ribbon along the edge.


More to come on making your own eclectic alpha wall!
Check out:
Link to Part 5 (Arranging and Hanging)

Sunday, February 16, 2014

DIY Eclectic Alphabet Wall Art: Part 2

Continuing on my letter-designing journey, here is how I did letters G to M. I tried to mix the wall up with some plain and some ornate designs. I also had a few family members make some letters for my baby girl's wall. I love that when we point to certain letters, she calls out "Nana" or "Col-col!"
G: I needed to have a great big letter G since our last name is Gallagher! This letter G is heavy, solid wood, and from Joann's. Using this post I found on Fun Cheap or Free as inspiration, I took to my piles of fabric scraps to dig out purples, tans, browns, and white. I used a cup to trace the size circle I wanted. I wadded up the circles and ran a bead of hot glue down on the wood. It is best to work in small patches-- I learned that one the hard way! This letter turned out heavier than all of the others so make sure you put some extra reinforcement on the back when you hang it up.
H: Letter H was made by my sister Colleen. This is a while chipboard letter that she had left over from a papercrafting kit. If you do not have a a pre-colored letter, make sure you paint it something that coordinates. You don't want orange peeking thru! Col gathered all of the purple, green, brown, and white  ribbon we had (which is a considerable amount). She cut short lengths of each and tied them around the letter. After she was done, we notices some slipping and sliding so Col applied glue to the back of the letter and ribbon to hold them in place.


I: I found a listing on Ebay and bought a few letters in this font for less than a dollar! Plain and simple, I spray painted the I.
J: This J is paper-mache with a wooden letter J glued to the front. I painted the larger letter brown, the trim white, and added polka dots (freehand) in two shades of purple. The wooden letter was white already. I added brown polka dots by dipping a pencil eraser into paint and dabbing them in a random pattern.


K: I purchased the K at Micheal's, It is wooden and came pre-painted white.

L: I purchased a set of blocks at a thrift store with this letter in mind. I glued them together with the smooth side facing out and lined up my daughters name so that it would be showing. I glued the blocks together first with hot glue-- this did not hold up to all the weight. Next, I tried Gorilla Glue... but I used the kind that foams and expands before I realized by mistake. I did my best to sand down the bumps that showed up, painted it white, and painted my daughter's name with glow-in-the-dark purple.
I may be re-doing the L. It gave me a few problems that I am not sure I can live with.

M: The letter M is actually a Cheerios box! I was toying with a few ideas like making it 3D but settled on using three layers of a cereal box, held together at the edges with masking tape. I painted over all of it with a royal purple. The letter is quite tall-- 11.5 inches.

More to come on making your own eclectic alpha wall!
Check out:

Wednesday, January 22, 2014

DIY Eclectic Alphabet Wall Art: Part 1


Let me have an honest moment with you, readers. I have lived in my house for over 5 years now and though I love DIY and art, there is not a single nail in my walls. It is a point of frustration for me that I am determined to remedy soon (and more on that later!).

When I was pregnant with my daughter (2 years ago), I was inspired by all of these lovely images I found all over the internet of eclectic alphabets hung in children’s rooms. My partner is not a fan of eclectic style but to my shock and amazement, he told me it was a great idea when I said I wanted to make letters to coordinate with the baby’s room. Honestly, I think that deep down he thought it would be a project that I would never finish. Well, joke is on him now! I applied my last coat of purple to the final letter last week and hung them all on the walls of my daughter’s room yesterday!

There is some great variety here so take a look! I would love to tell you how I made them—it might inspire you to create a few of your own as well. You don’t have to do the whole alphabet. Consider doing your street name in the front entrance, your family name in your living room, your child’s name in their bedroom, or your favorite creative word in your craft space!


A: Picked this one up at Home Goods. It was originally silver and designed to sit on a shelf. A healthy coating of green and the latticework of the metal shines.


B: I bought the letter and the canvas at Michael’s. The canvas is a part of a 10 pack of 8x10 value canvases. I wrote the uppercase B in pencil lightly and free hand then filled it in with purple acrylic paint. The lower case B was white and I spray painted it green.


C: My mom made this one! First, she used Spellbinder's to cut the flowers out of paper. Taking chalks, she colored the petals and adds a pollen accent on the middle with a Copic Marker. The flowers are hand painted with stickles on the inside for the touch of glitter every little girl needs.


D: This is a cardboard letter I got in the clearance section of Michaels—25 cents! I painted the letter purple then took purple glow-in-the-dark puffy paint and drew the scrolling design by hand. This letter was inspired by this pin!


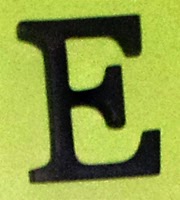
E : This is a pretty heavy pre-made letter. I bought it at Marshall’s. It’s a dark brown that I did not alter in any way. 


F: This one was fun to do! I started with two different weights of jewelry wire, a print out of the letter “F” in a font that I liked, and a can of purple spray paint. Bend the heavier weight wire to trace the outline of the letter that you have printed. Overlap the ends and twist off. Mine ends in the straight, flat area of the top of the F so that it is in a strong place for support. Next, twist and wrap the thin wire in and around the letter outline. I was going for a "scribbled" kind of look but you can certainly wrap in a more uniform pattern. This step, I used several lengths of wire so that the wrapping was easier. Just do your best to tuck in any sharp ends. Next, spray paint the letter whatever color you desire. This letter was inspired by the string art you see all over the internet these days... just with a different nod to it!


More letters (and better pictures, I swear) to come! Stay tuned...


Link to Part 4 (Letters T to Z)Link to Part 5 (Arranging and Hanging)
 

Thursday, January 16, 2014

Crafting Kiddies


There are so many wonderful businesses that allow our children to be crafty for free or for a very low price! I was a single mother with very limited income when i googled "fun things to do with your kids in Delaware County." This AWESOME blog popped up and changed my single mom life forever (and for the better!). www.kidsdelco.com

My favorite thing to do with my son, suggested by that blog, was the Home Depot's free monthly projects (every first Saturday of the month) geared toward kids ages 3-12 year old! My son has made some of the coolest, most useful items. Best of all....IT'S FREE!! The children are given all the supplies and instructions needed, their very own personalized Home Depot orange apron, a certificate award for completing the project, as well as a pin to place on their apron representing the project! Some of the items Dylan has made include: coasters, a race car, airplane, pencil case, shelf with a hook, jewelry box, and a desk calendar. I love them all!!! 

Lowes also does a similar thing with children. Theirs happens to be every two weeks instead of monthly! 

Now this next one is SUPER exciting! LEGOS!!! Who doesn't love Legos? Every month, your local Lego Store will have "Mini Builds" which are free for kids to build and keep! Mini Builds are strictly for ages 6-14 years old. This event takes place on the first Tuesday of every month. Check your local store for accurate dates and times! 

Michaels Craft Store (where some of us LIVE), also allows our children to be more creative and get their hands dirty! There may be a small fee to do these projects @ $5. 

This next crafty thing to do with your kids in not free but SUPER COOL!! I never heard of Color Me Mine until Maureen told me about it the other day. I am definitely checking this place out! On Sundays, they have a "Family Day" where up to two of your kids are free to paint while you paint. Bonus! I do not have to watch or "help." You can pick what you want...paint it...fire it up....keep it!


Also...Check out their project ideas! oooo INSPIRATION!!!

As always, KEEP IT CRAFTING!! 'Til next time! :)

Monday, January 13, 2014

Super Hero Tower - DIY Bookcase Dollhouse


Last year, I was browsing my pinterest boards for fun ideas and kept finding adorable kitchens and dollhouses made from old bookshelves and entertainment centers. I kept saying “if I had a daughter I would so be making this!” But I have a little boy with countless action figures he calls his guys. Then the light bulb went off. Why not make a dollhouse for his guys?! In the garage we had an old bookshelf (older than me) that just happens to have a peak on the top like the roof of a house and many different compartments that were perfect for little rooms. Seriously, I could not have found a better bookshelf.


The first thing I did was clean it. I scrubbed every nook and cranny because it was so old and endured the six of us beating it up and throwing things on it.

After that, I sanded down all the kinks – there were a lot! It felt good to use my hands and work with the wood, though. I think I want to learn to build things!


The bookshelf was a baby blue. I wanted to work with something neutral. I painted everything white. I knew I was going to cover up most of the shelving later on so I only put a coat or two in those areas. I mainly focused on the sides and top of the bookcase. I put on several coats until I was satisfied.


Next, I took a trip to Home Depot. I wandered over to the flooring section of the store and found some laminate tiles I thought would look great in my tower. I picked up several kinds of the wood floor tiles and a few dark black granite tiles. They cost around $.20 each. The cashier was confused by my assortment of tiles and had to ask me what kind of room I was working on. I also picked up a few of the free samples of hardwood and carpets. They’re free. Why not? Surely I’ll find a use for these.


I decided I wanted this to be a Super Hero tower. The majority of guys are super heroes, after all. Luckily, I had already picked up a 12 x 12 paper pad specifically for Superheroes from Michaels. They still have them on sale there. I picked out which papers I wanted to go in each room, thinking I’d put them on the walls of each shelf as wallpaper. Then I decided where the tiles would go for flooring. Since this was going to be super hero related, I wanted to make the bottom the BatCave and put the black granite tiles on the walls. That’s where all the heroes’ cars will be parked.


I used spray adhesive to stick on the paper which worked great and went by pretty quickly. I had to measure everything before cutting. It’s not perfect, but it’s fun.


Then I cut the tiles using a straight blade. (Technically, I had my dad do this part. He’s very precise.) We put the tiles in and voila, we have little rooms for the heroes to play.


After this, I took a long break (a few months) to find suitable furniture and accessories. I’ll write another post later on that includes everything. I hope this inspires you to use some of your old furniture pieces for play! If you don’t have any and really want to make something unique and fun for your kid, check out your local thrift stores, consignment stores, and yard sales for inexpensive pieces (big or small!) and remember that whatever it looks like, you can definitely spruce it up yourself with a little work.